

The Dreamiest Coffee Ice Cream Cake Recipe You’ll Ever Make
Rich coffee ice cream cake reimagines ordinary desserts into extraordinary culinary adventures.
Sweet dreams of creamy indulgence come alive with this decadent treat that blends smooth frozen textures and robust caffeine-infused flavors.
Delicate layers melt together, creating a symphony of cool, velvety sensations that dance across your palate.
Sophisticated yet approachable, this dessert bridges the gap between elegant dining and comforting nostalgia.
Chocolate and coffee enthusiasts will adore the deep, complex notes that weave through each delectable slice.
You’ll find this recipe surprisingly simple to assemble, requiring minimal technical skills but delivering maximum flavor impact.
Summer gatherings or intimate dinner parties become instantly memorable with this show-stopping confection.
Coffee Ice Cream Cake for Bold, Cold Dessert Lovers
Ingredients for a Dreamy Coffee Ice Cream Cake
Chocolate Base Ingredients:Dry Ingredients:Ice Cream and Topping Ingredients:Additional Components:Building Coffee Ice Cream Cake in Layers
Step 1: Prepare Baking Setup
Warm the oven to 375°F. Line an 8-inch round cake pan with parchment paper and lightly grease. Set aside.
Step 2: Create Chocolate Base
Melt chocolate using a double boiler with:Stir until smooth and let cool slightly.
Step 3: Incorporate Eggs
Whisk eggs into the chocolate mixture one at a time, ensuring complete blending after each addition.
Step 4: Mix Dry Ingredients
Combine flour and salt in a separate bowl. Fold flour mixture and remaining chopped chocolate into the batter until no dry streaks remain.
Step 5: Bake Brownie Layer
Pour batter into prepared pan. Bake for 20-25 minutes until center is set and a toothpick comes out clean. Cool in pan for 5 minutes.
Step 6: Release Brownie
Gently remove brownie from pan using an offset spatula. Transfer to a wire rack and cool completely.
Step 7: Prepare Cake Mold
Place cake ring on a parchment-lined baking sheet. Line ring with acetate. Position cooled brownie inside the ring.
Step 8: Add Coffee Ice Cream Layer
If using homemade ice cream:
Spread freshly churned coffee ice cream over brownie layer.
If using store-bought:
Soften ice cream by beating, then spread evenly.
Freeze for 2-3 hours until solid.
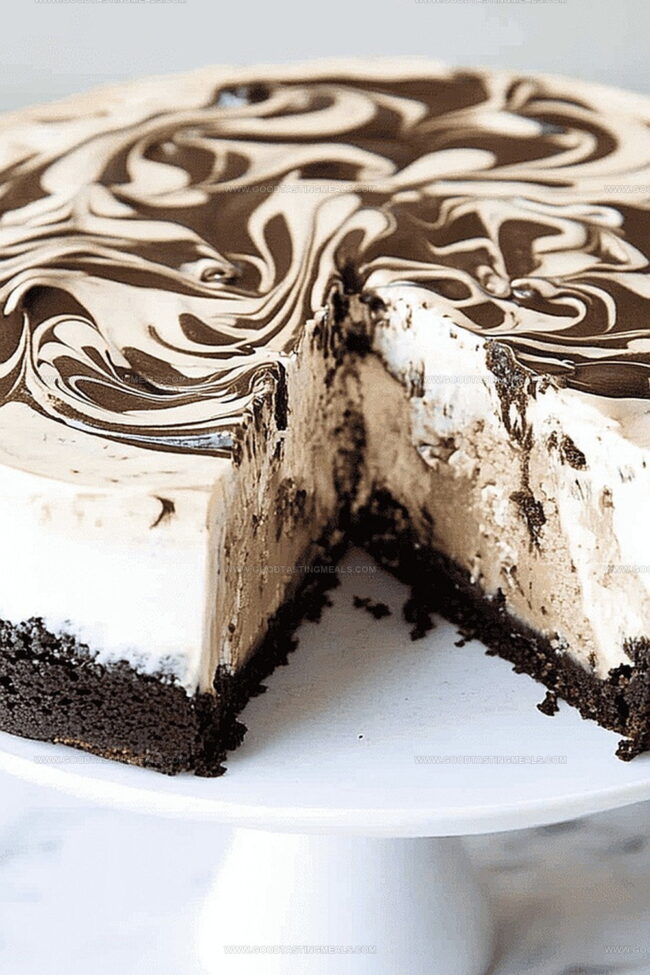
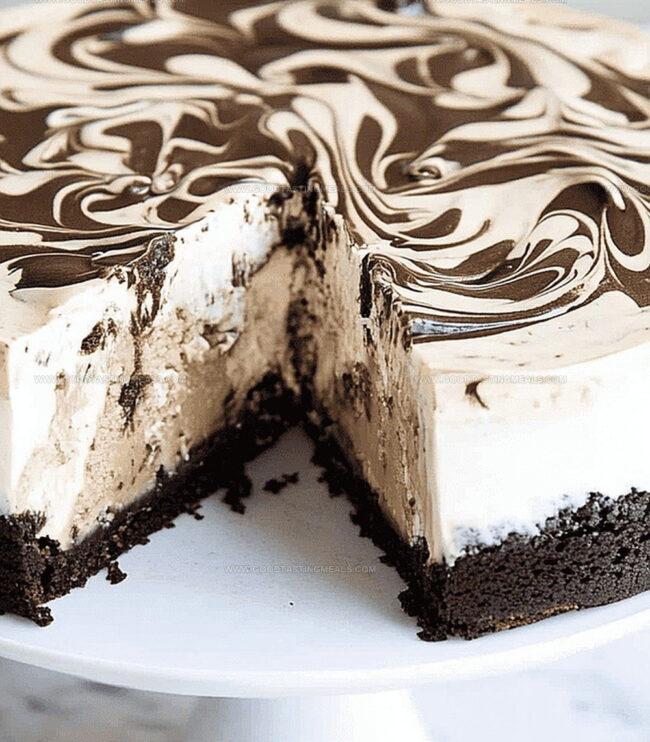
Step 9: Create Vanilla Swirl Layer
Soften vanilla ice cream and spread over coffee layer. Drizzle chocolate fudge and swirl with a knife. Freeze for 3 hours or overnight.
Step 10: Unmold and Prepare
Remove cake from freezer. Carefully remove cake ring and acetate strip. If melting, return to freezer briefly.
Step 11: Serve and Enjoy
Slice with a sharp knife. Serve immediately and savor the layers of chocolatey, creamy goodness.
Tips to Keep Ice Cream Cake From Melting Too Fast
How to Store and Slice Coffee Ice Cream Cake Cleanly
Pairing Ideas for Coffee Ice Cream Cake Plates
Coffee Ice Cream Cake Upgrades to Try Next
Print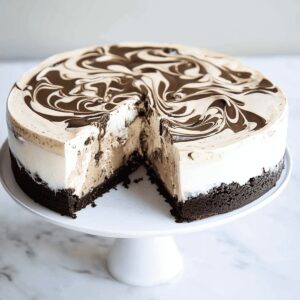
Coffee Ice Cream Cake Recipe
- Total Time: 50 minutes
- Yield: 8 1x
Description
Silky smooth coffee ice cream cake delivers pure indulgence with layers of rich espresso-infused dessert. Each elegant slice promises a luxurious journey through creamy textures and bold coffee notes that will tempt coffee enthusiasts into sweet bliss.
Ingredients
Main Ingredients:
- 1.5 pints (0.75 quart) coffee ice cream
- 1 pint (0.5 quart) vanilla ice cream
Sauce:
- 2 tablespoons chocolate fudge
Instructions
- Prepare an 8-inch round cake pan by lining it with parchment paper and applying a light grease coating.
- Utilize a double boiler to gently melt chocolate, sugars, and butter until achieving a silky, uniform consistency. Allow the mixture to cool slightly.
- Incorporate eggs into the chocolate mixture one at a time, whisking thoroughly after each addition to ensure a smooth blend.
- Combine flour and salt in a separate bowl. Fold the flour mixture and remaining chocolate chunks into the batter, mixing until no dry ingredients are visible.
- Transfer the batter to the prepared cake pan, spreading it evenly. Bake until the center sets and a toothpick emerges clean when inserted.
- After baking, let the brownie cool in the pan for a few minutes, then carefully remove and transfer to a wire rack to reach room temperature.
- Position a cake ring mold on a parchment-lined baking sheet. Wrap the interior with acetate and place the cooled brownie inside.
- For homemade coffee ice cream, spread a soft layer directly over the brownie base. Alternatively, soften store-bought coffee ice cream by mixing until spreadable.
- Freeze the first ice cream layer for 2-3 hours until completely solid.
- Prepare the vanilla ice cream using the same softening technique as the coffee layer. Spread evenly over the coffee ice cream.
- Create a decorative swirl by dolloping chocolate fudge across the vanilla layer and gently marbling with a knife.
- Return the cake to the freezer for an additional 3 hours or preferably overnight to ensure complete setting.
- Before serving, carefully remove the cake ring and acetate strip. If the cake begins to soften, briefly return it to the freezer.
- Slice with a sharp knife, allowing the brownie layer to slightly soften for easier cutting and a more enjoyable texture.
Notes
- Prep in advance by ensuring all ingredients are at room temperature for smooth mixing and better incorporation.
- Use high-quality chocolate and coffee for rich, intense flavors that elevate the entire dessert.
- Softening ice cream requires careful attention to prevent melting completely – aim for spreadable consistency.
- Freezing between layers helps create clean, defined ice cream cake sections and prevents blending.
- Acetate strip is crucial for easy cake removal and creating professional-looking layered dessert.
- Serve immediately after cutting to enjoy the perfect balance of soft brownie and frozen ice cream textures.
- Prep Time: 25 minutes
- Cook Time: 25 minutes
- Category: Desserts, Snacks, Drinks
- Method: Baking
- Cuisine: American
Nutrition
- Serving Size: 8
- Calories: 320
- Sugar: 32 g
- Sodium: 80 mg
- Fat: 15 g
- Saturated Fat: 9 g
- Unsaturated Fat: 5 g
- Trans Fat: 0 g
- Carbohydrates: 41 g
- Fiber: 1 g
- Protein: 4 g
- Cholesterol: 40 mg
Liam O’Brien
Founder & Recipe Developer
Expertise
Education
Dublin Institute of Technology (now Technological University Dublin)
Ballymaloe Cookery School, County Cork, Ireland
Liam O’Brien is the co-founder and kitchen soul behind Good Tasting Meals, a chef who believes that cooking shouldn’t feel stressful or complicated.
He earned his culinary stripes at Technological University Dublin and polished his farm-to-table skills at Ballymaloe Cookery School. With over 15 years flipping pans and stirring up stories, Liam has worked in family cafés, bustling bistros, and everything in between.
At Good Tasting Meals, Liam brings you recipes that feel like home: cozy, simple, and full of flavor.