

Quick & Crispy Cheesy Fried Grit Cakes Recipe
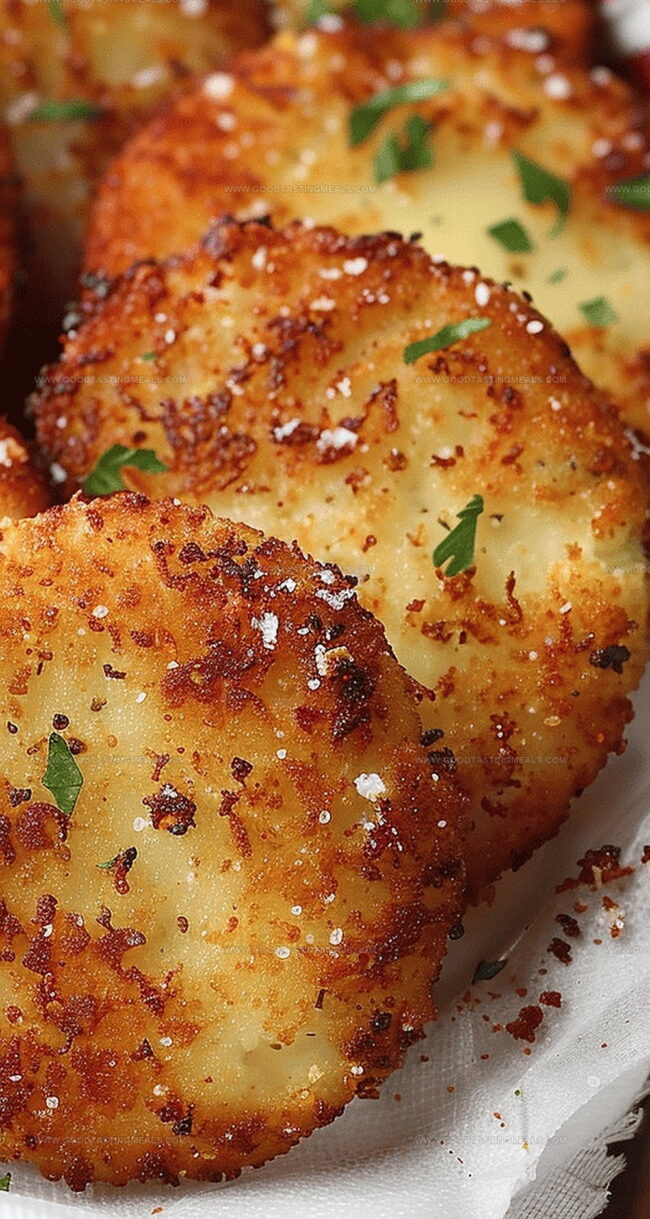
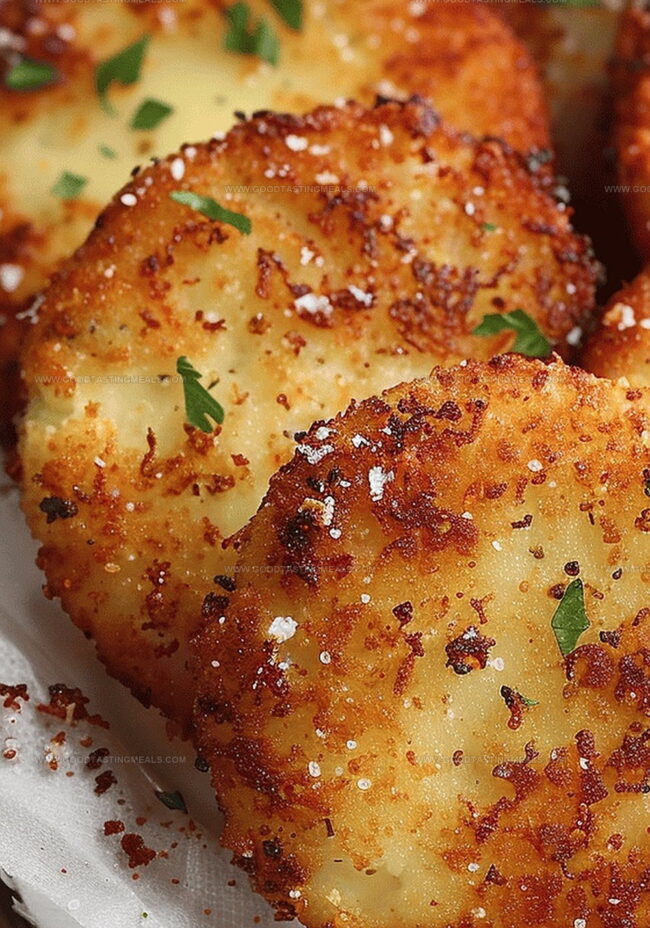
Southern kitchens buzz with comfort, and these crispy cheesy fried grit cakes deliver a mouthwatering twist on a classic favorite.
Creamy grits get an irresistible makeover when blended with sharp cheddar and formed into golden, crunchy patties.
Each bite promises a delightful contrast between the smooth interior and crackling exterior.
Perfectly seasoned and pan-fried to a beautiful golden brown, these grit cakes bring Southern hospitality right to your plate.
The combination of cheese and crisp texture makes this dish impossible to resist.
Weekend brunch or casual dinner, these grit cakes will steal the show and leave everyone asking for seconds.
Dive into this delectable recipe and experience a true Southern comfort food sensation.
Quick Recipe Overview
Ingredients for Cheesy Fried Grit Cakes
For Grits Base:For Cheese and Seasoning:For Coating and Frying:Tools That Help with Cheesy Fried Grit Cakes
How to Make Crispy Cheesy Fried Grit Cakes
Combine milk, water, and salt in a saucepan, bringing the mixture to a gentle simmer. Slowly stir in grits, creating a smooth and creamy base that will become the heart of your dish.
Remove from heat and fold in sharp cheddar cheese, allowing it to melt completely. Season with black pepper for a subtle kick of flavor that elevates the entire mixture.
Pour the cheesy grits into a flat dish, spreading evenly. Refrigerate until the mixture becomes firm and compact, typically requiring a few hours of peaceful resting time.
Use a circular cutter to transform the chilled grits into perfect round shapes. Prepare a crispy coating by whisking eggs and creating a seasoned breadcrumb mixture.
Carefully coat each grit cake in egg wash, then roll in seasoned breadcrumbs. Heat oil in a skillet until it shimmers with potential.
Fry the grit cakes until they develop a stunning golden-brown exterior, turning once to ensure even cooking. Drain on paper towels to remove excess oil before serving these delectable southern treats.
Tips to Add Bold Flavor to Grit Cakes
Serving Cheesy Fried Grit Cakes with Dips or Sauces
Storage Solutions for Fried Grit Cakes
Print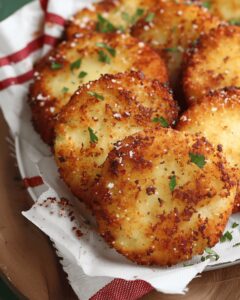
Crispy Fried Grit Cakes Recipe
- Total Time: 3 hours 20 minutes
- Yield: 5 1x
Description
Southern comfort meets culinary artistry in this cheesy fried grit cakes recipe, showcasing crispy exterior and creamy interior. Cheese-lovers will savor golden-brown edges and rich, melted center that promises pure Southern satisfaction.
Ingredients
- 1 cup instant grits
- 2 cups milk (mL)
- 2 cups water
- 3 eggs
- ½ cup shredded sharp cheddar cheese
- 2 cups panko breadcrumbs
- ¼ tsp salt
- ½ tsp black pepper
- 1 tbsp Creole seasoning
- 2 tbsps milk (for egg wash)
- oil for frying (enough to cover ½ inch in your pan)
Instructions
- Prepare Grits Base: Simmer liquid ingredients in a saucepan, creating a smooth, creamy foundation for the dish.
- Cheese Integration: Fold shredded sharp cheddar and black pepper into hot grits, stirring until cheese melts completely and blends seamlessly.
- Set and Chill: Transfer the grits mixture to a flat baking dish, spreading evenly. Refrigerate until solidified and easily sliceable.
- Create Coating Station: Whisk eggs in one bowl and season Panko breadcrumbs in another for a crispy exterior preparation.
- Shape and Coat: Cut chilled grits into circular shapes, then methodically dredge each cake through egg mixture and generously coat with seasoned breadcrumbs. Repeat coating for extra crispness.
- Fry to Perfection: Heat neutral oil in a heavy skillet until optimal frying temperature is reached. Carefully lower breaded grit cakes into hot oil, cooking 2-3 minutes per side until golden-brown and crispy.
- Final Presentation: Drain fried grit cakes on paper towels to remove excess oil, then serve immediately while exterior remains crunchy and interior stays creamy and warm.
Notes
- Chill Thoroughly: Refrigerate grits for at least 4 hours or overnight to ensure a firm, sliceable texture that holds its shape during breading and frying.
- Perfect Coating Technique: Double-dip each grit cake in egg and breadcrumbs for an extra-crispy, golden-brown exterior that seals in the creamy interior.
- Oil Temperature Matters: Maintain oil at 350-375°F for optimal frying, preventing soggy results and ensuring a crisp, evenly cooked grit cake.
- Serve Immediately: Enjoy right after frying to experience the perfect contrast between the crunchy exterior and the smooth, cheesy interior.
- Prep Time: 10 minutes
- Cook Time: 10 minutes
- Category: Breakfast, Snacks, Appetizer
- Method: Frying
- Cuisine: Southern American
Nutrition
- Serving Size: 5
- Calories: 355
- Sugar: 1 g
- Sodium: 250 mg
- Fat: 17 g
- Saturated Fat: 7 g
- Unsaturated Fat: 10 g
- Trans Fat: 0 g
- Carbohydrates: 40 g
- Fiber: 1 g
- Protein: 12 g
- Cholesterol: 98 mg
Sophie Martin
Co-Founder & Content Creator
Expertise
Education
Stellenbosch University, South Africa
South African Chefs Academy, Cape Town
Sophie Martin is the nutrition brain and feel-good foodie at Good Tasting Meals. With a degree in Human Nutrition from Stellenbosch University and chef training from the South African Chefs Academy, Sophie brings balance to the table, literally. She loves creating meals that are easy to make, great to eat, and good for your body too.
Her recipes are made for everyday living, with a little flair and a lot of heart. Sophie’s not here to count calories, she’s here to show you how fresh, simple food can fit into your life, taste amazing, and still be nourishing.