

Magical Birthday Cheesecake Recipe to Wow Your Guests
Celebrating special moments calls for something extraordinary, and this decadent birthday cheesecake recipe delivers pure magic.
Creamy, rich layers promise to make any celebration unforgettable.
Smooth cream cheese blends perfectly with sweet vanilla undertones, creating a dessert that melts in your mouth.
Each slice tells a story of indulgence and joy.
The silky texture and perfect balance of flavors will have everyone asking for seconds.
Birthdays deserve something spectacular, and this cheesecake rises to the occasion with its irresistible charm.
Get ready to become the ultimate party hero with this showstopping dessert.
Quick Recipe Overview
Birthday Cheesecake: What You’ll Need
For Crust:For Filling:For Topping:Tools to Bake Birthday Cheesecake Flawlessly
How to Bake a Birthday Cheesecake
Create a crunchy foundation using graham cracker crumbs mixed with sugar and butter. Press the mixture firmly into a springform pan, covering the bottom and sides with a delightful, sweet layer.
Blend cream cheese until silky smooth, gradually incorporating sugar, sour cream, and vanilla. Add eggs gently, ensuring a luxurious, velvety texture that will melt in your mouth.
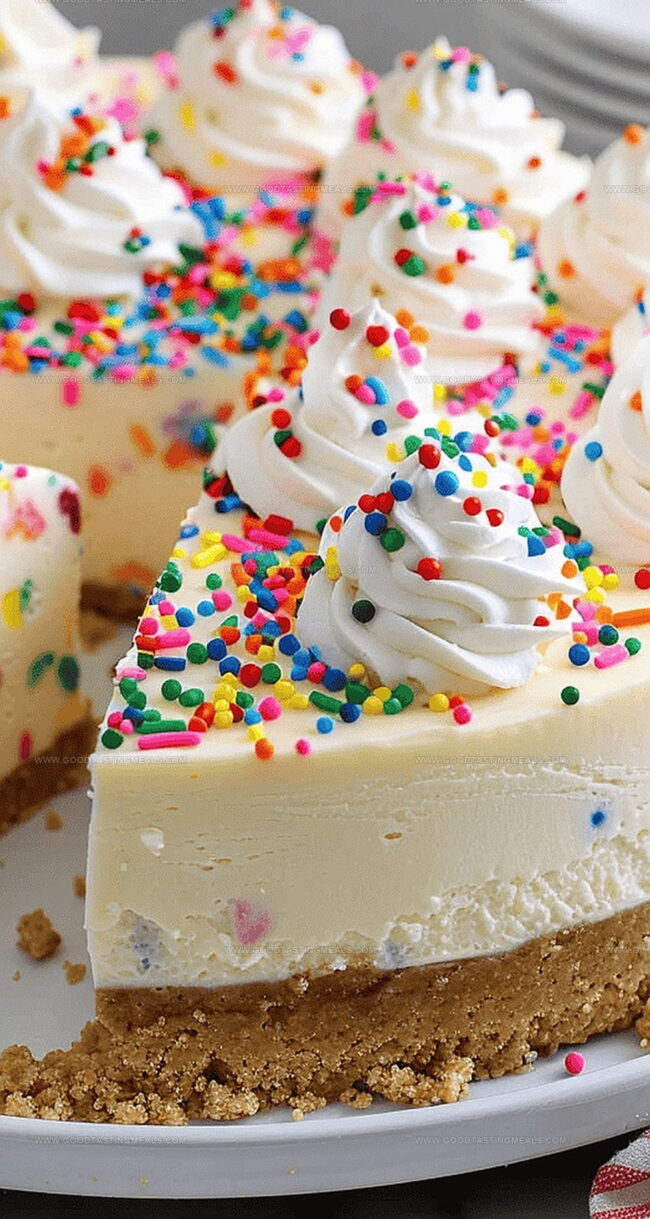
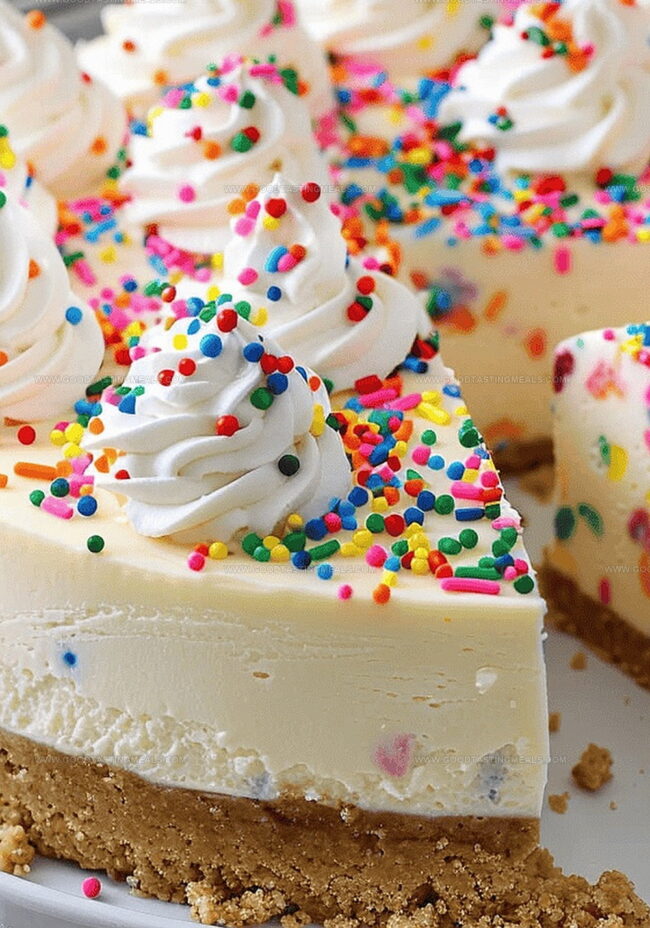
Fold rainbow sprinkles into the cheesecake mixture, creating bursts of color and playful excitement throughout the creamy base.
Place the cheesecake pan inside a larger roasting pan filled with hot water. This gentle cooking technique ensures a perfectly smooth and crack-free surface.
Bake until the top turns a beautiful golden hue and the center has a subtle jiggle. Allow the cheesecake to cool completely, letting the flavors develop and settle.
Decorate the cooled cheesecake with fluffy whipped cream peaks and a sprinkle of colorful jimmies, transforming it into a festive dessert that screams celebration.
Birthday Cheesecake: Make It Extra Festive
Serving Ideas for Birthday Cheesecake
Storing Birthday Cheesecake the Smart Way
Print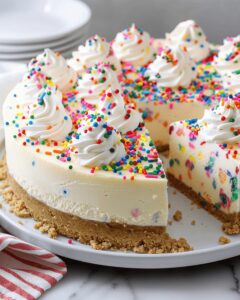
Dreamy Birthday Cheesecake Recipe
- Total Time: 90 minutes
- Yield: 13 1x
Description
Homemade birthday cheesecake brings classic comfort to celebration tables with rich, creamy texture. Delicate graham cracker crust and smooth cream cheese filling promise sweet memories you’ll cherish.
Ingredients
- 4 packages (8 oz or 226 g) cream cheese, softened
- 5 large eggs, room temperature
- 1 ½ cups (126 g) graham cracker crumbs
- 1 ¼ cups (250 g) granulated sugar
- ½ cup (115 g) sour cream
- 2 tsp vanilla extract
- ⅓ cup unsalted butter, melted
- 6–8 oz (170–226 g) whipped cream
- ½ cup rainbow jimmies (or sprinkles)
- 2 tbsps granulated sugar
- Extra rainbow jimmies for garnish
Instructions
- Crust Preparation: Pulverize graham cracker crumbs with sugar and melted butter until achieving a texture resembling damp sand, then firmly press the mixture into a parchment-lined springform pan, covering the bottom and slightly ascending the sides.
- Foil Protection: Meticulously wrap the pan’s exterior with heavy-duty aluminum foil to shield against water penetration during baking.
- Cream Cheese Mixing: Utilize a stand mixer to transform softened cream cheese into a silky-smooth consistency, gradually introducing sugar and beating until achieving a light, airy texture.
- Liquid Integration: Gently fold in sour cream and vanilla extract, then delicately incorporate eggs one at a time, maintaining a luxurious batter composition.
- Sprinkle Infusion: Tenderly blend rainbow jimmies throughout the mixture, ensuring even distribution using a spatula.
- Baking Setup: Position the filled springform pan inside a larger roasting pan, then slide into a preheated 350°F (175°C) oven, carefully adding hot water to create a water bath reaching midway up the pan’s sides.
- Baking Process: Allow the cheesecake to bake for 60-70 minutes, monitoring for a golden surface and a subtle jiggle at the center when gently nudged.
- Cooling and Finishing: Remove from the oven and water bath, letting the cheesecake cool completely on a wire rack, then adorn with whipped cream swirls and an additional sprinkle of rainbow jimmies for a festive presentation.
Notes
- Seal Pan Carefully: Wrap the springform pan tightly with aluminum foil to prevent water seepage during the water bath, which can ruin the cheesecake’s texture.
- Room Temperature Ingredients: Ensure cream cheese, eggs, and sour cream are at room temperature to create a smoother, lump-free batter and prevent cracking.
- Gentle Mixing Technique: Mix eggs into the batter one at a time and blend gently to maintain a silky, crack-free cheesecake consistency.
- Cooling Strategy: Allow the cheesecake to cool gradually at room temperature to prevent sudden temperature changes that can cause surface cracks, ensuring a perfect, smooth finish.
- Prep Time: 20 minutes
- Cook Time: 60-70 minutes
- Category: Desserts
- Method: Baking
- Cuisine: American
Nutrition
- Serving Size: 13
- Calories: 366
- Sugar: 35 g
- Sodium: 300 mg
- Fat: 22 g
- Saturated Fat: 13 g
- Unsaturated Fat: 9 g
- Trans Fat: 0 g
- Carbohydrates: 34 g
- Fiber: 1 g
- Protein: 6 g
- Cholesterol: 105 mg
Sophie Martin
Co-Founder & Content Creator
Expertise
Education
Stellenbosch University, South Africa
South African Chefs Academy, Cape Town
Sophie Martin is the nutrition brain and feel-good foodie at Good Tasting Meals. With a degree in Human Nutrition from Stellenbosch University and chef training from the South African Chefs Academy, Sophie brings balance to the table, literally. She loves creating meals that are easy to make, great to eat, and good for your body too.
Her recipes are made for everyday living, with a little flair and a lot of heart. Sophie’s not here to count calories, she’s here to show you how fresh, simple food can fit into your life, taste amazing, and still be nourishing.