

Sweet Peanut Butter Stuffed Brownies Recipe for Chocoholics
The rich, fudgy world of chocolate meets creamy peanut butter stuffed brownies in a decadent dessert that promises pure indulgence.
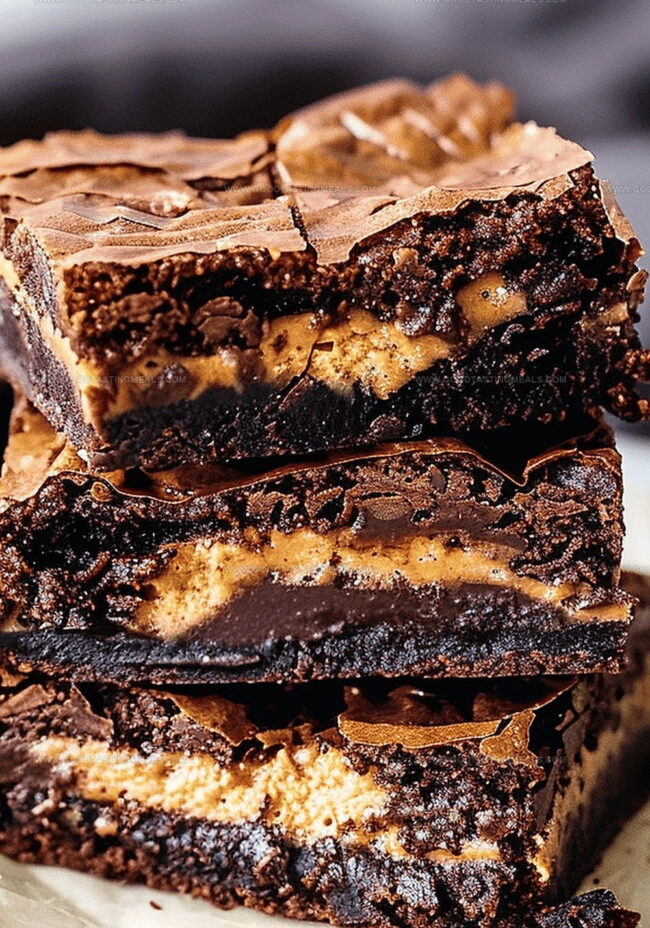
Silky chocolate batter envelops a luscious peanut butter center, creating a mouthwatering surprise with every bite.
Layers of intense flavor meld together, turning an ordinary brownie into an extraordinary treat.
Chocolate lovers and peanut butter enthusiasts will find themselves utterly captivated by this irresistible combination.
The contrast between dense, moist brownie and smooth peanut butter filling creates a symphony of textures that dance on your palate.
Each slice reveals a delightful hidden treasure of creamy peanut butter waiting to be savored.
Get ready to elevate your dessert game with this crowd-pleasing recipe that guarantees smiles and satisfied sweet cravings.
Quick Recipe Overview

Peanut Butter Stuffed Brownies Ingredient Guide
For Peanut Butter Layer:For Chocolate Base:For Brownie Structure and Flavor:Tools That Help Fill Brownies with Peanut Butter
How to Bake Brownies with Gooey Centers
Peanut Butter Stuffed Brownies
Create a smooth peanut butter layer by warming it briefly in the microwave. Spread the softened peanut butter into a square pan lined with parchment paper. Pop the pan into the freezer until the layer becomes solid and firm.
Melt chocolate and butter together in a microwave, stirring carefully between short intervals. Mix in sugar until the mixture looks glossy and smooth. Allow the mixture to cool slightly.
Whisk eggs and vanilla into the chocolate mixture until the batter looks rich and slightly thickened. Gently fold in flour and cocoa powder, being careful not to overmix the delicate batter.
Remove the frozen peanut butter layer from the freezer. Pour half the brownie batter into the pan, place the frozen peanut butter sheet on top, then cover with remaining batter.
Bake in a preheated oven at 350°F for approximately 30 minutes. The brownies should look set but still have a slight wiggle in the center.
Allow brownies to cool completely in the pan. Lift out using parchment paper and slice into delectable squares. These treats taste amazing when chilled and can be stored in an airtight container for several days.
Tips for Making the Peanut Butter Pop
How to Present These Brownies at Parties
Store Stuffed Brownies Without Drying the Middle
Print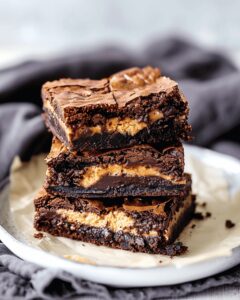
Fudgy Peanut Butter Stuffed Brownies Recipe
- Total Time: 1 hour 50 minutes
- Yield: 13 1x
Description
Gooey peanut butter stuffed brownies combine rich chocolate with creamy peanut butter centers for an irresistible dessert. Chocolate lovers will savor each decadent bite of this indulgent treat.
Ingredients
- 1.25 cups (336 g) creamy peanut butter
- 10 tbsps (142 g) unsalted butter
- 4 oz (113 g) semisweet baking chocolate, chopped
- 1 cup (200 g) granulated sugar
- 2 large eggs plus 1 egg yolk
- 0.5 cup (64 g) all-purpose flour
- 0.25 cup (25 g) unsweetened cocoa powder, sifted
- 0.25 tsp fine salt
- 1 tsp vanilla extract
Instructions
- Peanut Butter Preparation: Microwave peanut butter for 25 seconds until smooth and liquid-like, creating an easily spreadable consistency.
- Pan Preparation: Line an 8-inch square metal pan with parchment paper, allowing slight overhang for easy removal.
- Peanut Butter Layer: Spread the warmed peanut butter evenly across the pan, creating a uniform sheet.
- Freezing Process: Freeze the peanut butter layer for 60 minutes until completely solid, then remove using parchment paper and return to freezer.
- Oven Setup: Preheat oven to 350°F with rack positioned in the center.
- Chocolate Base: Melt chocolate and butter in microwave using 30-second intervals, stirring between cycles until smooth and glossy.
- Batter Development: Whisk sugar into melted chocolate mixture, then incorporate eggs, additional yolk, and vanilla extract, blending thoroughly for one minute until slightly thickened.
- Dry Ingredient Integration: Gently fold flour, cocoa powder, and salt into the batter, minimizing stirring to maintain delicate texture.
- Layering: Pour half the brownie batter into prepared pan, position frozen peanut butter sheet directly on top, then cover completely with remaining batter.
- Baking Process: Bake for 30 minutes, watching for set exterior with slight center jiggle.
- Cooling Method: Rest brownies in pan for 30 minutes, then lift out using parchment paper and cool an additional 30 minutes before slicing.
- Storage and Serving: Store in airtight container at room temperature for up to three days or refrigerate for five days. Serve chilled for optimal fudgy texture.
Notes
- Prepare Peanut Butter Precisely: Microwave peanut butter for exactly 25 seconds to achieve a smooth, pourable consistency without overheating.
- Freeze for Perfect Layering: Freezing the peanut butter sheet allows for clean, precise placement within the brownie batter, preventing mixing and ensuring a distinct filling.
- Minimize Mixing Magic: When incorporating dry ingredients, fold gently and sparingly to maintain the brownie’s rich, fudgy texture and prevent tough, dense results.
- Serve Temperature Matters: Chilling the brownies intensifies their decadent fudge-like quality, creating a more luxurious and intense flavor experience.
- Prep Time: 20 minutes
- Cook Time: 30 minutes
- Category: Desserts, Snacks
- Method: Baking
- Cuisine: American
Nutrition
- Serving Size: 13
- Calories: 276
- Sugar: 14 g
- Sodium: 53 mg
- Fat: 20 g
- Saturated Fat: 8 g
- Unsaturated Fat: 12 g
- Trans Fat: 0 g
- Carbohydrates: 24 g
- Fiber: 1 g
- Protein: 6 g
- Cholesterol: 43 mg
Sophie Martin
Co-Founder & Content Creator
Expertise
Education
Stellenbosch University, South Africa
South African Chefs Academy, Cape Town
Sophie Martin is the nutrition brain and feel-good foodie at Good Tasting Meals. With a degree in Human Nutrition from Stellenbosch University and chef training from the South African Chefs Academy, Sophie brings balance to the table, literally. She loves creating meals that are easy to make, great to eat, and good for your body too.
Her recipes are made for everyday living, with a little flair and a lot of heart. Sophie’s not here to count calories, she’s here to show you how fresh, simple food can fit into your life, taste amazing, and still be nourishing.