

Sweet Little Apple Hand Pies Recipe: A Portable Treat Joy
Warm, golden pastries filled with cinnamon-spiced apple hand pies burst with homemade comfort that transports you straight to grandma’s kitchen.
Sweet aromas of baked fruit and buttery crust will dance through your home, tempting every hungry soul nearby.
These little pockets of deliciousness combine flaky dough with tender, caramelized apples in a perfectly portable dessert.
Crisp autumn afternoons call for something special, and these hand-held treats deliver pure delectable magic.
Each bite promises a rich blend of traditional flavors and modern simplicity.
Compact, adorable, and irresistibly delicious, these hand pies offer a delightful twist on classic apple desserts.
Grab your ingredients and get ready to bake pure happiness in every single bite.
Quick Recipe Overview

Apple Hand Pies Ingredient Guide
For Pastry Base:For Filling:For Glazing and Frying:For Sealing and Finishing:Equipment Needed for Apple Hand Pies
Step-by-Step Instructions for Apple Hand Pies

Flaky Pastry Delight
Roll out smooth pie dough into thin, delicate rounds using a circular cookie cutter. Each round should be small enough to create a handheld treat.
Spoon fragrant apple mixture onto center of each pastry round. Ensure filling is cooled to prevent soggy edges.
Gently fold pastry into half-moon shapes, pressing edges together with a fork to create decorative crimped borders. Seal with a light water wash to ensure no filling escapes.
Heat oil in a deep pan until shimmering and hot. Carefully lower pies into bubbling oil, cooking until they transform into golden, crispy parcels.
While pies are still warm, drizzle with silky sweet glaze. The coating should cascade gracefully over the crisp exterior, creating a tempting shine that beckons hungry taste buds.
Transfer to a beautiful serving platter, allowing the pies to cool slightly. These handheld delights are best enjoyed fresh, with their crisp exterior and warm, gooey center.
Pro Tips for Flaky Apple Hand Pies
Serving Ideas for Apple Hand Pies
Best Storage Methods for Apple Hand Pies
Print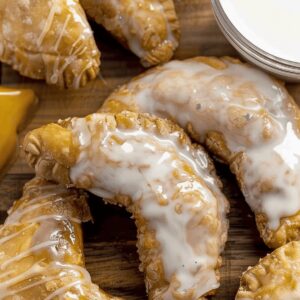
Golden Apple Hand Pies
- Total Time: 35 min
- Yield: 9 1x
Description
Home bakers can master this delightful apple hand pies recipe with simple ingredients and classic techniques. Crisp pastry envelops sweet, spiced apple filling, creating a portable dessert perfect for autumn gatherings and family celebrations.
Ingredients
- 2 boxes store-bought pie crust dough
- 1 homemade pie crust recipe
- 1 can (21 oz / 595 g) store-bought apple pie filling
- 2 cups apple pie filling
- 4 cups (250 g) confectioners’ sugar
- 5–7 tbsps whole milk, room temperature
- Vegetable oil, for frying
Instructions
- Dough Preparation: Roll out pastry dough to a thin ⅛-inch thickness and cut into 4-5-inch circular rounds using a precise circular cutter, aiming for 26-28 total pastry circles.
- Filling and Sealing: Distribute cooled apple filling at the center of each round, carefully folding pastry into half-moon shapes. Moisten edges with water, then crimp firmly with fork tines to create a robust seal.
- Oil Heating: Warm oil in a deep skillet to 375°F, using a cooking thermometer to ensure precise temperature control for optimal frying conditions.
- Frying Process: Gently submerge 2-3 hand pies into hot oil, allowing them to transform into crisp, golden-brown pastries through 3-4 minutes of careful frying. Transfer immediately to paper towels to absorb excess oil.
- Glazing Technique: Whisk confectioners’ sugar with milk to create a smooth, pourable glaze. While hand pies remain warm, generously coat with glaze by drizzling or full immersion, ensuring complete coverage.
- Serving: Present hand pies immediately to maintain peak texture and temperature, showcasing the delicate balance of crisp pastry and luscious apple filling.
Notes
- Dough Thickness Matters: Roll pastry precisely to ⅛-inch for consistent, delicate texture that ensures even cooking and crispy edges.
- Cooling Filling Prevents Disaster: Allow apple mixture to completely cool before adding to pastry to avoid soggy, weak dough structure.
- Sealing Technique is Critical: Use water and fork crimping to create tight, leak-proof edges that prevent filling from escaping during frying.
- Temperature Control Ensures Perfection: Maintain oil at exact 375°F using a cooking thermometer to achieve golden-brown exterior without burning or undercooking.
- Prep Time: 20 min
- Cook Time: 15 min
- Category: Desserts, Snacks
- Method: Frying
- Cuisine: American
Nutrition
- Serving Size: 9
- Calories: 320
- Sugar: 20 g
- Sodium: 150 mg
- Fat: 15 g
- Saturated Fat: 3 g
- Unsaturated Fat: 10 g
- Trans Fat: 0 g
- Carbohydrates: 45 g
- Fiber: 1 g
- Protein: 2 g
- Cholesterol: 5 mg
Sophie Martin
Co-Founder & Content Creator
Expertise
Education
Stellenbosch University, South Africa
South African Chefs Academy, Cape Town
Sophie Martin is the nutrition brain and feel-good foodie at Good Tasting Meals. With a degree in Human Nutrition from Stellenbosch University and chef training from the South African Chefs Academy, Sophie brings balance to the table, literally. She loves creating meals that are easy to make, great to eat, and good for your body too.
Her recipes are made for everyday living, with a little flair and a lot of heart. Sophie’s not here to count calories, she’s here to show you how fresh, simple food can fit into your life, taste amazing, and still be nourishing.