
Quick & Creamy Homemade Reeses Peanut Butter Eggs Recipe
These homemade Reeses peanut butter eggs capture a nostalgic treat with surprising simplicity and irresistible charm.
Chocolate and peanut butter lovers understand the magnetic pull of this classic combination.
Crafting these confections revolutionizes ordinary ingredients into something magical and deeply satisfying.
Sweet memories often emerge from childhood favorite desserts like these delightful eggs.
Home bakers can recreate this beloved treat with minimal kitchen skills and maximum deliciousness.
Smooth peanut butter blends seamlessly with rich chocolate, creating a decadent experience that rivals store-bought versions.
The process feels like culinary alchemy, turning basic ingredients into something extraordinary.
Reese’s Peanut Butter Eggs, Homemade Style

Ingredients for Reese’s Style Peanut Butter Eggs
Base Ingredients:Flavor Enhancers:Binding and Texture Ingredients:Coating Ingredients:Decorative Ingredient:Steps to Make Peanut Butter Eggs at Home
Step 1: Prepare Peanut Butter Mixture
Grab a large mixing bowl and microwave:Blend until smooth using an electric mixer. Add vanilla and salt, mixing thoroughly until well combined.
Step 2: Create Peanut Butter Dough
Gradually incorporate powdered sugar using electric mixer. The mixture will look crumbly initially. Add milk slowly until a soft dough forms. Aim for a slightly loose consistency that will firm up when chilled.
Step 3: Chill and Shape Filling
Line a 9×13 inch pan with parchment paper. Press peanut butter mixture evenly into pan. Refrigerate for 30-60 minutes until completely cooled.
Step 4: Cut Egg Shapes
Remove chilled peanut butter filling from pan. Use an egg-shaped cookie cutter to create egg shapes. Place eggs on a parchment-lined baking sheet. Rework any remaining filling by rolling and pressing into cookie cutter. Freeze eggs for 30-60 minutes until firm.
Step 5: Prepare Chocolate Coating
Create a double boiler:Add chocolate and oil to the bowl. Stir frequently until completely melted and smooth.
Step 6: Coat Eggs in Chocolate
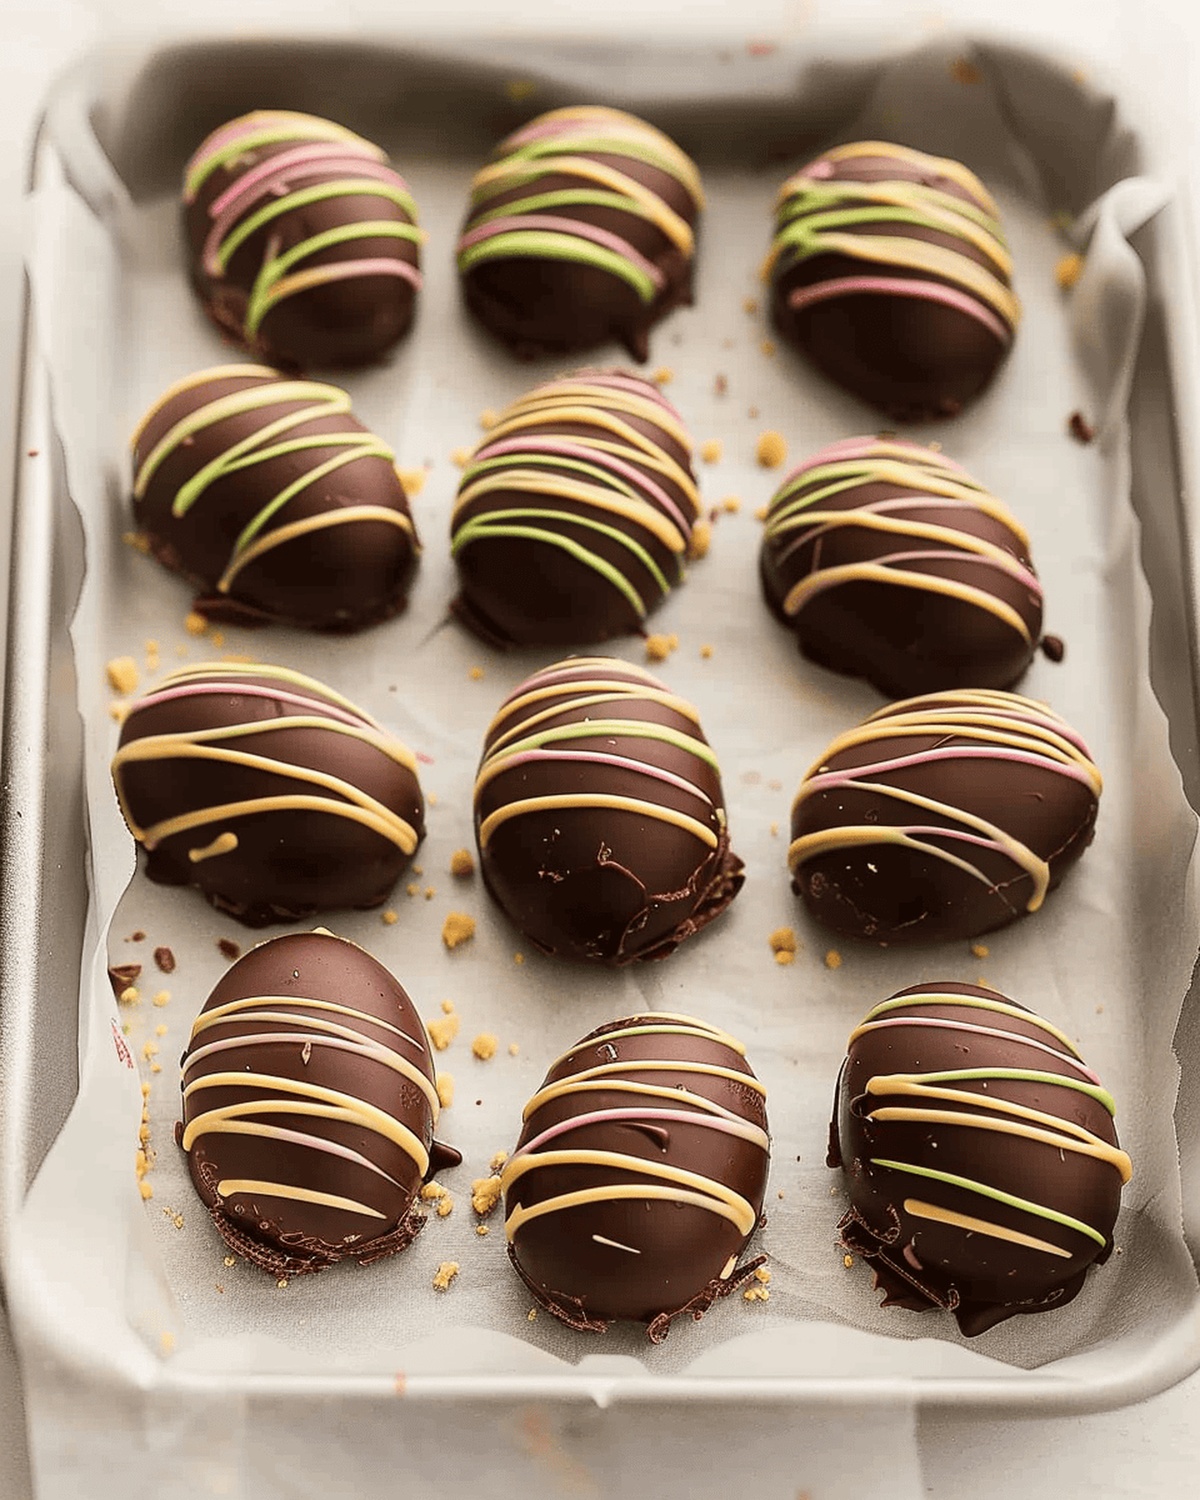
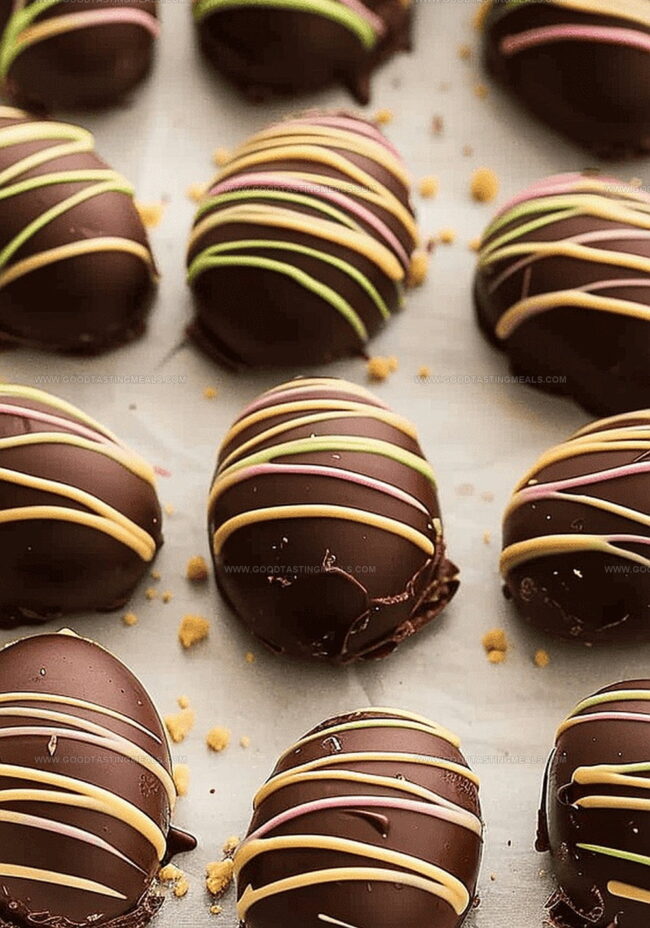
Use a fork to dip each frozen egg into melted chocolate. Tap fork on bowl’s edge to remove excess chocolate. Place coated eggs back on parchment-lined baking sheet.
Step 7: Add Decorative Drizzle
Melt white chocolate using same double boiler method. Add food coloring if desired. Transfer to a zip-top bag and snip a small corner to drizzle decorative patterns over chocolate-covered eggs.
Step 8: Store and Serve
Keep eggs refrigerated or frozen until ready to enjoy. Serve chilled for best texture and flavor.
Tips to Shape and Set These Eggs Just Right
Keep These Peanut Butter Eggs Fresh
Peanut Butter Egg Pairings to Try
Creative Variations on Classic PB Eggs
Print
Homemade Reeses Peanut Butter Eggs Recipe
- Total Time: 35 minutes
- Yield: 12 1x
Description
Homemade Reese’s Peanut Butter Eggs offer a delightful twist on classic Easter treats. Creamy peanut butter filling wrapped in rich chocolate creates an irresistible indulgence that delights chocolate and peanut butter enthusiasts looking for a sweet, nostalgic experience.
Ingredients
Main Ingredients:
- 2 cups (480 ml) smooth peanut butter
- ½ cup (113 grams) unsalted butter
- 3 cups (360 grams) powdered sugar
Binding and Flavoring Ingredients:
- 5–6 tablespoons (75–90 ml) milk
- 1 tablespoon vanilla extract
- ½ teaspoon salt
Coating and Decoration:
- 350 grams (12.3 ounces) dark chocolate
- 3 teaspoons (15 ml) canola oil
- 100 grams (3.5 ounces) white chocolate (optional)
- Food coloring
Instructions
- In a spacious mixing bowl, gently melt peanut butter and butter in the microwave until almost completely liquefied. Blend thoroughly using an electric mixer until perfectly incorporated.
- Incorporate vanilla extract and salt, mixing until a smooth consistency is achieved.
- Gradually introduce powdered sugar while using an electric mixer. The mixture will initially appear crumbly and slightly dry.
- Carefully add milk, adjusting the quantity to create a soft, pliable peanut butter dough. The texture should be slightly loose, as it will firm up when cooled.
- Transfer the mixture into a 9 x 13 inches (23 x 33 centimeters) pan lined with parchment paper. Smooth the surface evenly and refrigerate for 30-60 minutes until thoroughly chilled.
- Extract the peanut butter filling from the pan, removing the parchment paper carefully. Utilize an egg-shaped cookie cutter to create precise egg shapes.
- Arrange the egg-shaped portions on a parchment-lined baking sheet. Rework any remaining filling by rolling and pressing into the cookie cutter to maximize usage.
- Place the baking sheet in the freezer for 30-60 minutes, ensuring the eggs become completely firm.
- Create a double boiler by placing 1 inch (2.5 centimeters) of water in a small pot. Heat to a gentle simmer over medium-high temperature.
- Select a glass bowl that fits securely over the pot without touching the water. Combine chocolate and vegetable oil in the bowl, positioning it above the simmering water.
- Stir the chocolate mixture frequently until completely melted and achieving a smooth, glossy texture.
- Using a fork, carefully dip each frozen egg into the melted chocolate, allowing excess to drip off by tapping the fork’s edge against the bowl.
- Repeat the melting process with white chocolate, omitting the oil. Add food coloring if desired.
- Transfer the white chocolate to a zip-top sandwich bag, snipping a small corner to create a makeshift piping bag.
- Drizzle the colored white chocolate over the chocolate-coated eggs for decorative effect.
- Store the completed Reese’s Peanut Butter Eggs in the refrigerator or freezer until ready to serve.
Notes
- Chill the peanut butter filling thoroughly to ensure clean, crisp egg shapes when cutting.
- Work quickly when coating eggs in chocolate to prevent melting and maintain a smooth, even chocolate layer.
- Use a fork for dipping eggs to allow excess chocolate to drip off, creating a thin, professional-looking coating.
- Freezing the eggs before dipping helps them hold their shape and prevents crumbling during chocolate coating.
- White chocolate drizzle adds a decorative touch and can be customized with food coloring for festive variations.
- Store in an airtight container in the refrigerator for up to a week to maintain freshness and texture.
- Prep Time: 30 minutes
- Cook Time: 5 minutes
- Category: Desserts, Snacks
- Method: Melting
- Cuisine: American
Nutrition
- Serving Size: 12
- Calories: 425 kcal
- Sugar: 28 g
- Sodium: 180 mg
- Fat: 31 g
- Saturated Fat: 15 g
- Unsaturated Fat: 12 g
- Trans Fat: 0.5 g
- Carbohydrates: 35 g
- Fiber: 2 g
- Protein: 8 g
- Cholesterol: 35 mg
Liam O’Brien
Founder & Recipe Developer
Expertise
Education
Dublin Institute of Technology (now Technological University Dublin)
Ballymaloe Cookery School, County Cork, Ireland
Liam O’Brien is the co-founder and kitchen soul behind Good Tasting Meals, a chef who believes that cooking shouldn’t feel stressful or complicated.
He earned his culinary stripes at Technological University Dublin and polished his farm-to-table skills at Ballymaloe Cookery School. With over 15 years flipping pans and stirring up stories, Liam has worked in family cafés, bustling bistros, and everything in between.
At Good Tasting Meals, Liam brings you recipes that feel like home: cozy, simple, and full of flavor.