
Best Peanut Butter Blossom Bars Recipe for Sweet-Tooth Lovers
Peanut butter blossom bars upgrade classic cookie memories into an irresistible dessert sensation that sparks joy with every bite.
Sweet nostalgia meets modern convenience in this delightful treat that reimagines a beloved childhood favorite.
Soft, chewy textures blend perfectly with rich, nutty flavors that dance across your palate.
Crumbly base layers create a delectable foundation for a dessert that feels both familiar and exciting.
Chocolate and peanut butter harmonize in a way that celebrates comfort and indulgence simultaneously.
Homemade goodness radiates from these bars, promising a simple yet impressive confection that delights everyone.
Simple ingredients and minimal effort guarantee a crowd-pleasing dessert that will become your new go-to sweet treat.
Peanut Butter Blossom Bars That Steal the Show
Ingredients You Need for Peanut Butter Blossom Bars
Base Ingredients:Dry Ingredients:Finishing Ingredients:How to Prepare Peanut Butter Blossom Bars Step-by-Step
Step 1: Prep the Oven and Baking Dish
Warm up the oven to 350°F (175°C). Grab a 9×13-inch baking dish and coat it with cooking spray or butter to prevent sticking.
Step 2: Create the Peanut Butter Base
In a large mixing bowl, blend together:Whip these ingredients until they form a smooth, creamy mixture.
Step 3: Mix the Dry Ingredients
Fold in the following ingredients:Stir until a soft, slightly sticky dough comes together.
Step 4: Spread the Dough
Transfer the dough to the prepared baking dish. Use your hands or a spatula to press it evenly across the entire surface. Sprinkle a light dusting of granulated sugar on top for an extra crispy texture.
Step 5: Bake to Perfection
Slide the baking dish into the preheated oven. Bake for 20-22 minutes. Look for golden-brown edges and a toothpick that comes out clean when inserted in the center.
Step 6: Add the Chocolate Surprise
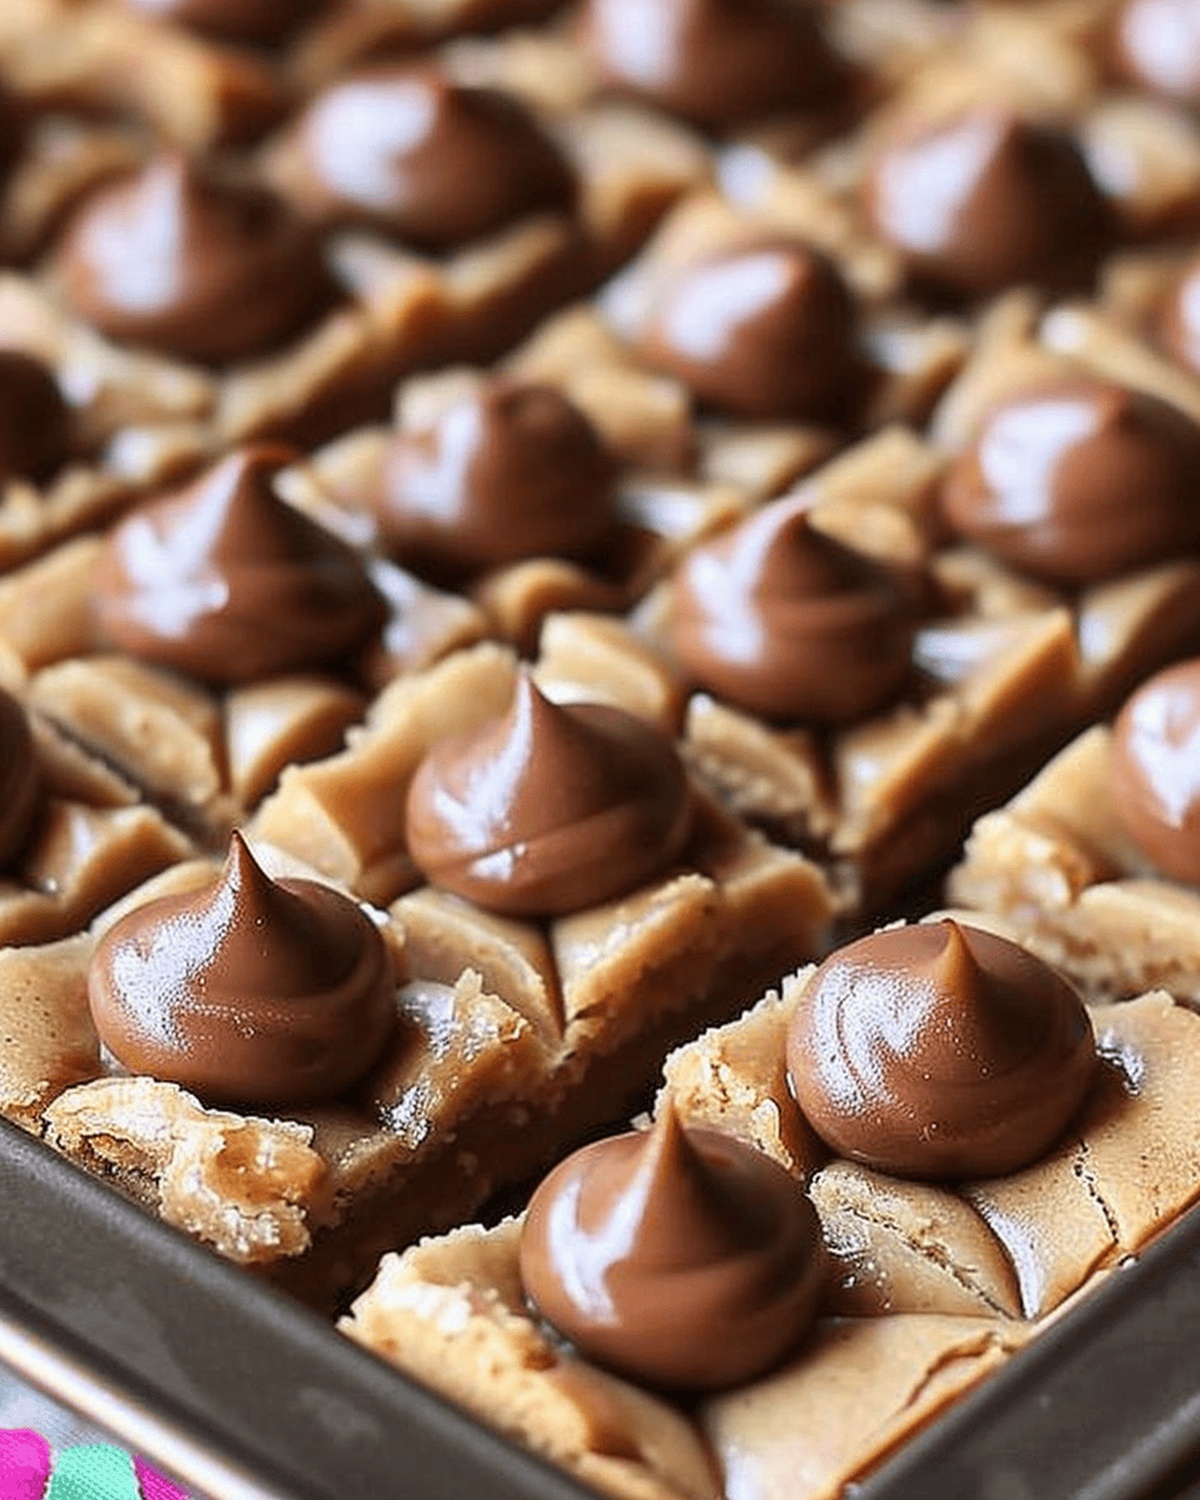
Right after removing from the oven, gently press a Hershey’s Kiss into the center of each bar section. The warmth will help the chocolate slightly melt and stick to the base.
Step 7: Cool and Serve
Let the bars cool completely in the baking dish. This helps them set and makes cutting easier. Once cooled, slice into squares, each with a chocolatey Kiss center.
Step 8: Store for Later
Keep the bars fresh by storing them in an airtight container at room temperature. They’ll stay delicious for several days – if they last that long!
Tips for Perfecting Peanut Butter Blossom Bars
Keeping Peanut Butter Blossom Bars Fresh and Soft
What to Serve With Peanut Butter Blossom Bars
Fun Twists on Peanut Butter Blossom Bar Recipes
Print
Peanut Butter Blossom Bars Recipe
- Total Time: 37 minutes
- Yield: 16 1x
Description
Sweet peanut butter blossom bars blend classic cookie comfort with irresistible chocolate kiss charm. These nostalgic treats deliver rich, creamy layers that melt in your mouth and transport you to childhood baking memories.
Ingredients
Main Ingredients:
- 1.5 cups (360 ml) all-purpose flour
- ½ cup (120 ml) creamy peanut butter
- ½ cup (115 g) unsalted butter, softened
Sugars:
- ½ cup (100 g) brown sugar
- ½ cup (100 g) granulated sugar
Additional Ingredients:
- ⅔ cup (113 g) milk chocolate chips
- 1 large egg
- ¾ teaspoon baking soda
- ½ teaspoon baking powder
- 1/8 teaspoon salt
- 24 Hershey’s Kisses
Instructions
- Prepare the oven by heating to 350°F (175°C) and thoroughly coat a 9×13-inch baking dish with a light layer of grease to prevent sticking.
- Create a smooth, creamy base by vigorously whisking together softened butter, granulated sugar, brown sugar, peanut butter, and egg until the mixture becomes uniform and slightly fluffy.
- Gradually fold in flour, baking soda, baking powder, and salt, ensuring no dry pockets remain in the dough, then gently incorporate milk chocolate chips for added texture and sweetness.
- Transfer the soft dough into the prepared baking dish, using clean hands or a spatula to distribute it evenly across the surface, creating a consistent thickness.
- Sprinkle a delicate layer of granulated sugar over the dough to provide a subtle crunch and enhanced golden appearance.
- Place the baking dish in the preheated oven and bake for 20-22 minutes, watching for light golden edges and checking doneness by inserting a toothpick into the center, which should emerge clean.
- Immediately after removing from the oven, while the bars are still warm and soft, carefully press a Hershey’s Kiss into the center of each bar, allowing the chocolate to slightly melt and adhere.
- Allow the bars to cool completely within the baking dish, which helps them set and makes cutting easier, resulting in clean, defined squares with a chocolate centerpiece.
- Once cooled, slice into individual bars and transfer to an airtight container to maintain freshness and prevent the bars from drying out.
Notes
- Customize the sweetness by adjusting the amount of granulated sugar sprinkled on top for a personalized crunch.
- Press Hershey’s Kisses immediately after baking to ensure they melt slightly and adhere perfectly to the warm bars.
- Use room temperature ingredients like butter and egg for smoother, more consistent dough mixing.
- Check doneness with the toothpick test, looking for a clean insertion and lightly golden edges to prevent over-baking.
- Cooling completely in the pan helps bars set properly and makes cutting easier without crumbling.
- Store bars in an airtight container at room temperature for up to 5 days to maintain freshness and soft texture.
- Prep Time: 15 minutes
- Cook Time: 22 minutes
- Category: Desserts, Snacks
- Method: Baking
- Cuisine: American
Nutrition
- Serving Size: 16
- Calories: 200
- Sugar: 14 g
- Sodium: 100 mg
- Fat: 10 g
- Saturated Fat: 4 g
- Unsaturated Fat: 6 g
- Trans Fat: 0 g
- Carbohydrates: 25 g
- Fiber: 1 g
- Protein: 3 g
- Cholesterol: 20 mg
Liam O’Brien
Founder & Recipe Developer
Expertise
Education
Dublin Institute of Technology (now Technological University Dublin)
Ballymaloe Cookery School, County Cork, Ireland
Liam O’Brien is the co-founder and kitchen soul behind Good Tasting Meals, a chef who believes that cooking shouldn’t feel stressful or complicated.
He earned his culinary stripes at Technological University Dublin and polished his farm-to-table skills at Ballymaloe Cookery School. With over 15 years flipping pans and stirring up stories, Liam has worked in family cafés, bustling bistros, and everything in between.
At Good Tasting Meals, Liam brings you recipes that feel like home: cozy, simple, and full of flavor.