

Tasty Pizza Sliders Party Appetizer Recipe for Game Day Fun
Compact pizza sliders bring together two beloved comfort foods in one irresistible bite-sized package.
Small yet packed with incredible flavor, these miniature marvels reimagine traditional meal expectations into something wonderfully playful.
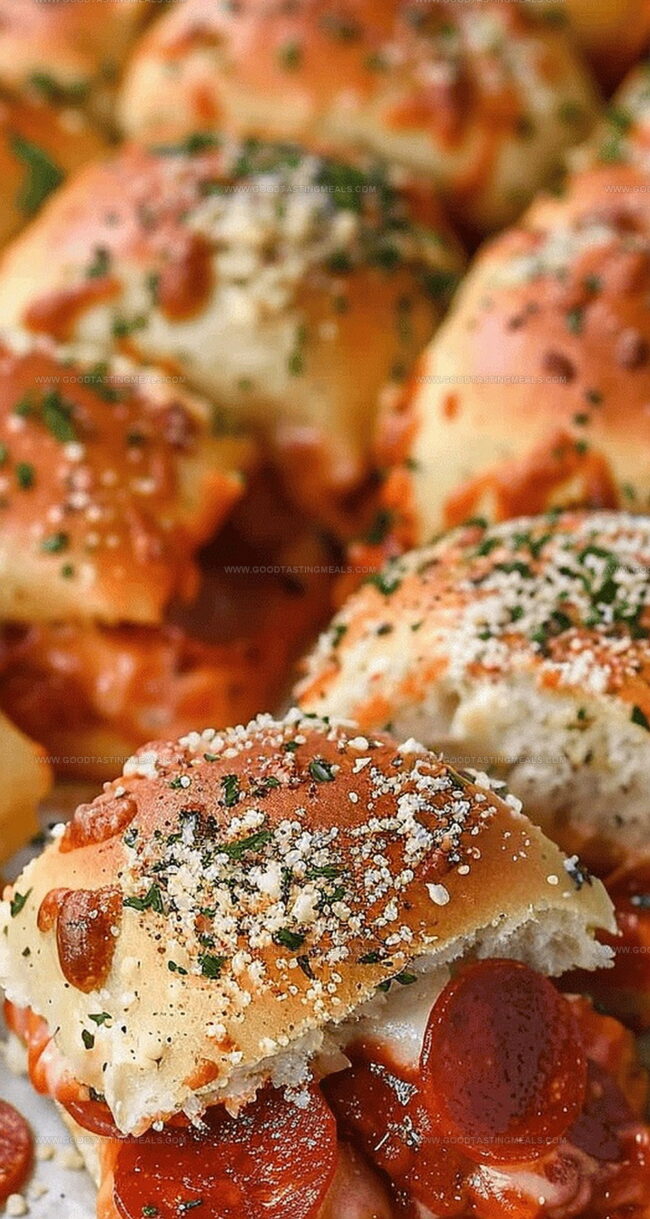
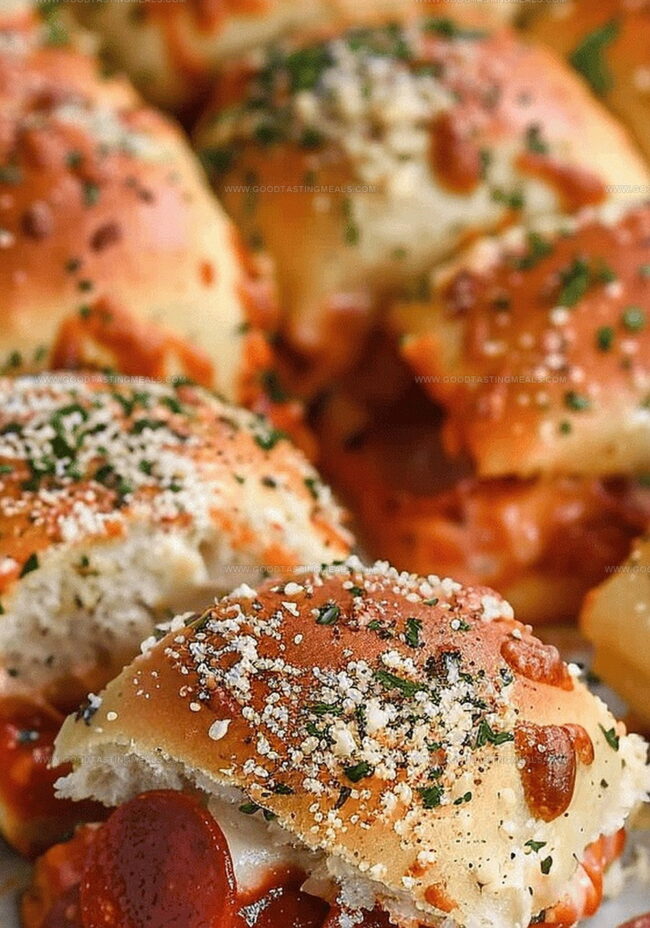
Crispy edges, melted cheese, and savory ingredients create a delightful culinary experience that sparks joy at any gathering.
Their versatile nature allows you to customize each slider with preferred toppings and personal taste preferences.
Crowd-pleasing and easy to assemble, these sliders work magic for casual family dinners or festive game-day celebrations.
Perfectly portioned and bursting with zesty ingredients, they represent a creative twist on classic pizza enjoyment.
Guests will absolutely adore these handheld delights that combine convenience with mouthwatering satisfaction.
Why Pizza Sliders Are Crowd-Pleasing Favorites
What’s Inside These Melty Mini Sandwiches
Main Ingredients:
Slider Rolls: Soft, sweet rolls that serve as the base for the pizza sliders, providing a pillowy foundation for the toppings.
Pizza Sauce: Classic tomato-based sauce with herbs that adds moisture and traditional pizza flavor to the sliders.
Pepperoni: Classic pizza meat that brings spicy, savory flavor and traditional pizza character to the dish.
Cheese Ingredients:
Mozzarella Cheese: Mild, stretchy cheese that melts beautifully and creates a classic pizza-like texture.
Parmesan Cheese: Sharp, salty cheese that adds depth of flavor and a slight crunch when baked.
Seasoning and Topping Ingredients:
Butter: Rich, melted butter that helps create a golden, crispy exterior and adds richness to the sliders.
Dried Parsley: Mild herb that adds subtle green color and fresh herbaceous notes.
Onion Powder: Concentrated seasoning that provides a smooth, sweet onion flavor without added moisture.
Garlic Powder: Intense seasoning that brings deep, savory garlic taste to the sliders.
Oregano: Traditional pizza herb that adds an authentic Italian-style flavor profile.
Building Pizza Sliders with All the Flavor
Step 1: Warm Up the Oven
Crank your oven to 350°F (175°C). Grab a baking sheet and line it with parchment paper for easy cleanup.
Step 2: Whip Up the Flavor Boost
Grab a small bowl and mix together:Set this tasty mixture aside for later.
Step 3: Build Your Slider Base
Slice those soft rolls right down the middle. Lay the bottom halves on your prepared baking sheet. Spread a generous layer of pizza sauce across the rolls. Next, create your flavor explosion by adding:Step 4: Crown Your Sliders
Place the top halves of the rolls over your cheesy masterpiece. Brush the tops with your flavor-packed butter mixture. Dust with a final sprinkle of Parmesan cheese.
Step 5: Bake to Perfection
Pop those sliders into the oven for 18-22 minutes. Watch for golden-brown tops and melted, bubbly cheese.
Step 6: Serve and Devour
Pull out your sizzling sliders and serve immediately. Keep some extra pizza sauce on the side for dipping and watch everyone’s eyes light up!
Slider Tips for Crisp Buns and Gooey Cheese
How to Keep Sliders Tasting Fresh Later On
Best Dips, Drinks & Sides for Pizza Sliders
Pizza Slider Variations to Keep Things Exciting
Print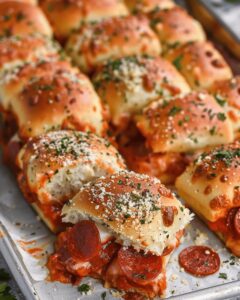
Pizza Sliders Recipe
- Total Time: 32 minutes
- Yield: 12 1x
Description
Pizza sliders bring Italian-inspired mini sandwiches to your favorite party spread. Melted cheese, zesty marinara, and mini pepperoni nestled between fluffy slider rolls create an irresistible bite you’ll crave again and again.
Ingredients
Main Ingredients:
- 12 Hawaiian rolls or dinner rolls or slider buns
- 1 cup (237 milliliters) pizza sauce
- 4 ounces (113 grams) mini pepperoni slices
- 8 ounces (226 grams) shredded mozzarella cheese
Cheese and Seasonings:
- 4 tablespoons (60 milliliters) grated Parmesan cheese
- ½ teaspoon dried oregano
- ½ teaspoon onion powder
- ½ teaspoon garlic powder
Topping:
- 3 tablespoons (45 milliliters) melted butter
- 1 teaspoon dried parsley
Instructions
- Preheat the oven to 350°F and line a baking dish with parchment paper, ensuring a smooth surface for even cooking.
- Create a flavorful butter glaze by whisking melted butter with dried parsley, onion powder, and garlic powder in a small mixing bowl.
- Carefully slice the dinner rolls horizontally, creating a base and top for each slider.
- Arrange the bottom half of the rolls in the prepared baking dish, creating a uniform layer.
- Spread pizza sauce generously across the roll bottoms, ensuring complete coverage for maximum flavor infusion.
- Layer pepperoni slices evenly over the sauce, creating a consistent meat distribution.
- Sprinkle mozzarella cheese and Parmesan cheese over the pepperoni, allowing the cheese to melt and bind the ingredients.
- Dust the cheese layer with a light sprinkle of oregano for an aromatic herb touch.
- Gently place the top halves of the rolls onto the prepared base, creating compact slider sandwiches.
- Brush the roll tops thoroughly with the prepared butter mixture, ensuring complete and even coverage.
- Finish by sprinkling the remaining Parmesan cheese over the buttered tops.
- Bake in the preheated oven for 18-22 minutes until the cheese melts and the rolls turn golden brown.
- Remove from the oven and let rest briefly before serving with additional pizza sauce for dipping.
Notes
- Prep these sliders quickly for a crowd-pleasing appetizer or casual meal that takes less than 30 minutes from start to finish.
- Layer ingredients strategically to ensure every bite delivers maximum flavor, with pepperoni, two types of cheese, and zesty pizza sauce.
- Use soft dinner rolls or Hawaiian rolls for the best texture, creating a perfect balance between crispy edges and soft centers.
- Customize toppings by swapping pepperoni with ham, adding vegetables, or experimenting with different cheese combinations.
- Store leftovers in an airtight container and reheat in the oven to maintain crispy tops and melty cheese texture.
- Make ahead by assembling sliders up to 24 hours in advance, refrigerating, and baking just before serving for convenient entertaining.
- Prep Time: 10 minutes
- Cook Time: 22 minutes
- Category: Lunch, Snacks, Appetizer
- Method: Baking
- Cuisine: Italian
Nutrition
- Serving Size: 12
- Calories: 292
- Sugar: 2 g
- Sodium: 661 mg
- Fat: 16 g
- Saturated Fat: 7 g
- Unsaturated Fat: 9 g
- Trans Fat: 0 g
- Carbohydrates: 30 g
- Fiber: 1 g
- Protein: 10 g
- Cholesterol: 27 mg
Liam O’Brien
Founder & Recipe Developer
Expertise
Education
Dublin Institute of Technology (now Technological University Dublin)
Ballymaloe Cookery School, County Cork, Ireland
Liam O’Brien is the co-founder and kitchen soul behind Good Tasting Meals, a chef who believes that cooking shouldn’t feel stressful or complicated.
He earned his culinary stripes at Technological University Dublin and polished his farm-to-table skills at Ballymaloe Cookery School. With over 15 years flipping pans and stirring up stories, Liam has worked in family cafés, bustling bistros, and everything in between.
At Good Tasting Meals, Liam brings you recipes that feel like home: cozy, simple, and full of flavor.