

Crafty Pizza Artist: The Bubbly Artisan Crust Recipe
Crafting the perfect crispy, chewy, and bubbly artisan pizza crust recipe takes more than just mixing ingredients.
Professional pizzaiolos know that creating restaurant-quality dough requires passion and precision.
This homemade pizza base delivers authentic Italian flavors straight from your kitchen.
Every bite promises a delightful combination of textures that will transport you to a cozy trattoria.
The secret lies in selecting high-quality flour and allowing sufficient resting time for the dough.
Professional techniques combined with simple ingredients make this recipe foolproof for pizza enthusiasts.
You’ll impress everyone with this delectable, golden-brown masterpiece that rivals pizzeria standards.
Quick Recipe Overview
What Makes Crispy, Chewy, and Bubbly Artisan Pizza Crust Work
For Dough Base:For Preparation Essentials:For Optional Finishing:Tools That Shape the Perfect Pizza Crust
Crafting Artisan Pizza Crust at Home
Mix flour with most of the water until just combined. Let the mixture rest and relax.
Wake up the yeast in warm water, preparing it for the dough’s transformation.
Sprinkle salt and fold the yeast mixture into the dough using gentle hand movements. Blend ingredients through soft stretching and pinching motions.
Allow the dough to breathe and develop character for about an hour.
Strengthen the dough by carefully folding and turning, creating a smooth and elastic texture.
Let the dough grow and expand, doubling in size over 5-6 hours.
Divide the dough and craft beautiful round balls through careful stretching and folding techniques.
Let the shaped dough balls relax and reach room temperature before potential refrigeration.
Crank the oven to maximum heat, using a pizza steel or stone for perfect crispy results.
Stretch the dough, add toppings, and bake until the crust turns golden and toppings become beautifully melted.
Pizza Crust Fixes That Add Personality
Serve Your Artisan Pizza with Restaurant Vibes
Pizza Dough Storage Tips for Home Cooks
Print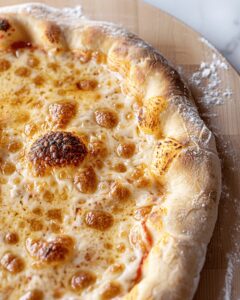
Rustic Artisan Pizza Crust
- Total Time: 6-8 hours
- Yield: 5 1x
Description
Homemade artisan pizza crust delivers crispy, chewy perfection with professional baker techniques. Italian culinary traditions inspire this simple yet remarkable bread foundation that elevates home cooking experiences.
Ingredients
- 500 grams (3 ¾ cups plus 2 tablespoons) all-purpose flour
- 375 grams (1 ½ cups plus 2 tablespoons) warm water
- 10 grams (1 ½ tsps) fine salt
- 1 gram (¼ tsp) active dry yeast
Instructions
- Hydration: In a large mixing bowl, blend flour with most water until just combined. Allow mixture to rest, covered, for 20 minutes to initiate gluten development.
- Yeast Activation: Dissolve yeast in remaining warm water, preparing for incorporation.
- Ingredient Integration: Sprinkle salt across dough surface, then pour yeast liquid. Merge ingredients by moistening hands and gently stretching dough sections, creating a cohesive mixture through pinching and folding techniques.
- Fermentation: Cover bowl and let dough mature for one hour, developing complex flavor profiles.
- Gluten Development: Execute stretch-and-fold technique, rotating the container 4-5 times until dough forms a compact, elastic ball. Transfer to a lightly oiled container, positioning seam downward.
- Proofing: Allow dough to rise 5-6 hours until volume doubles, enhancing texture and flavor complexity.
- Dough Preparation: Divide risen dough into two portions, systematically folding quarter sections toward center. Create surface tension by dragging across work surface until achieving taut, circular shapes.
- Resting: Position dough balls on greased plates, lightly oil, and rest at room temperature for one hour. Optional refrigeration possible for up to two days.
- Oven Preparation: Preheat oven to maximum temperature (500°F), positioning pizza steel or stone on middle rack for 45 minutes to ensure optimal heat retention.
- Dough Shaping: Flatten dough into a substantial disk, maintaining thick perimeter. Utilize gravitational pull to stretch into 12-inch circular form, carefully transferring to floured pizza peel or oiled cast iron pan.
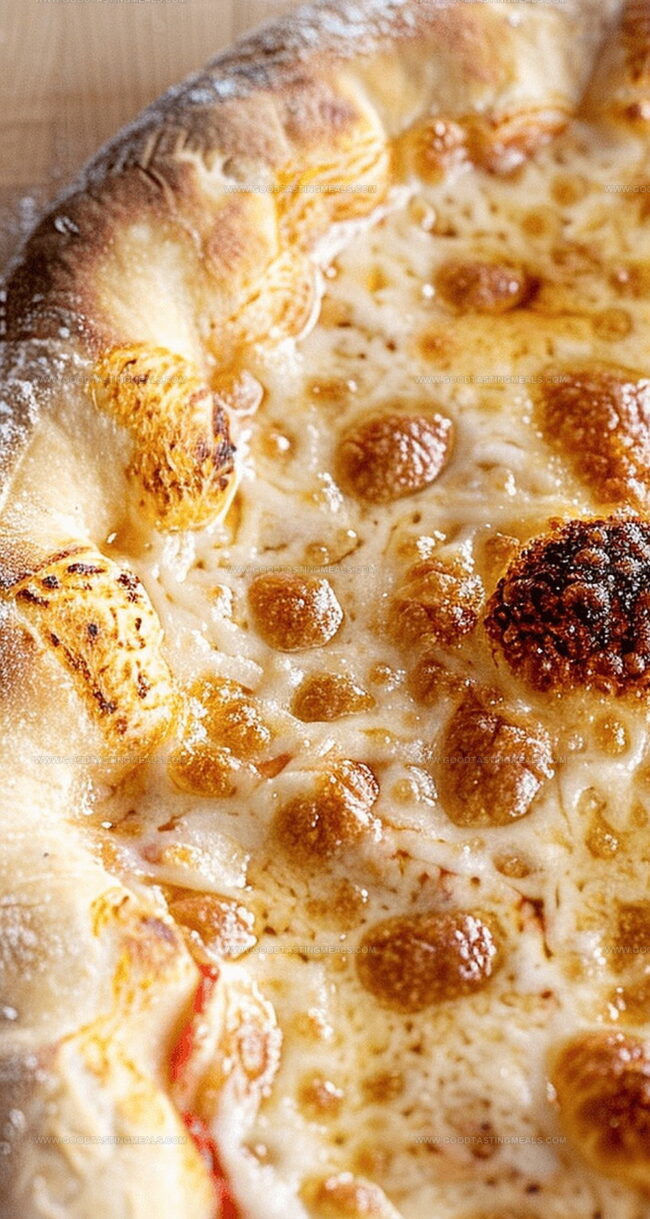
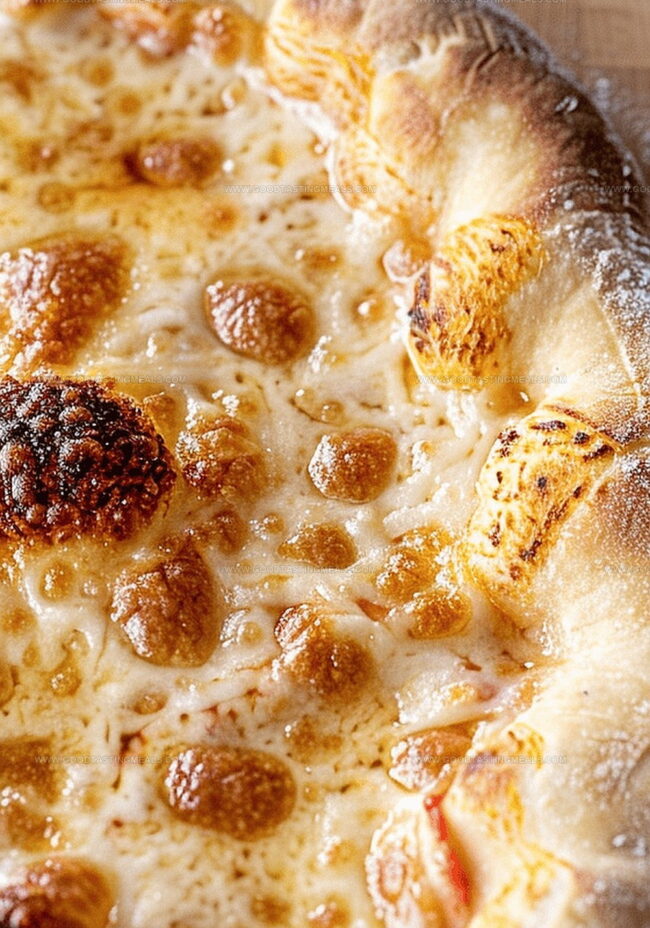
- Topping and Baking: Layer sauce and preferred toppings, preserving outer edge. Slide pizza onto preheated surface, baking for 5 minutes. Activate broiler to finish, watching for golden, blistered crust and melted cheese (2-4 minutes).
- Final Execution: Repeat process with remaining dough ball, experimenting with alternative topping combinations.
Notes
- Patience Pays Off: Allow dough to rest and develop gluten, which creates incredible texture and flavor complexity.
- Handle with Care: Gentle stretching and folding techniques are crucial for developing a light, airy pizza crust structure.
- Temperature Matters: Preheating pizza stone or steel for 45 minutes ensures a crispy, restaurant-quality bottom crust.
- Timing is Key: Monitor broiler closely during final 2-4 minutes to achieve perfect golden-brown bubbles without burning.
- Prep Time: 30 minutes (plus resting and rising time)
- Cook Time: 5-20 minutes (depending on method)
- Category: Lunch, Dinner, Appetizer, Snacks
- Method: Baking
- Cuisine: Italian
Nutrition
- Serving Size: 5
- Calories: 150
- Sugar: 0 g
- Sodium: 200 mg
- Fat: 0.5 g
- Saturated Fat: 0.1 g
- Unsaturated Fat: 0.4 g
- Trans Fat: 0 g
- Carbohydrates: 31 g
- Fiber: 1 g
- Protein: 4 g
- Cholesterol: 0 mg
Sophie Martin
Co-Founder & Content Creator
Expertise
Education
Stellenbosch University, South Africa
South African Chefs Academy, Cape Town
Sophie Martin is the nutrition brain and feel-good foodie at Good Tasting Meals. With a degree in Human Nutrition from Stellenbosch University and chef training from the South African Chefs Academy, Sophie brings balance to the table, literally. She loves creating meals that are easy to make, great to eat, and good for your body too.
Her recipes are made for everyday living, with a little flair and a lot of heart. Sophie’s not here to count calories, she’s here to show you how fresh, simple food can fit into your life, taste amazing, and still be nourishing.