

Zesty Lemon Thumbprint Cookies Recipe: Sweet Citrus Joy
Soft, buttery cookies dance with zesty lemon thumbprint cookies recipe that promise pure delight in every bite.
These delectable treats blend tangy citrus with sweet, crumbly goodness.
A classic favorite gets a bright, sunny makeover with minimal ingredients and maximum flavor.
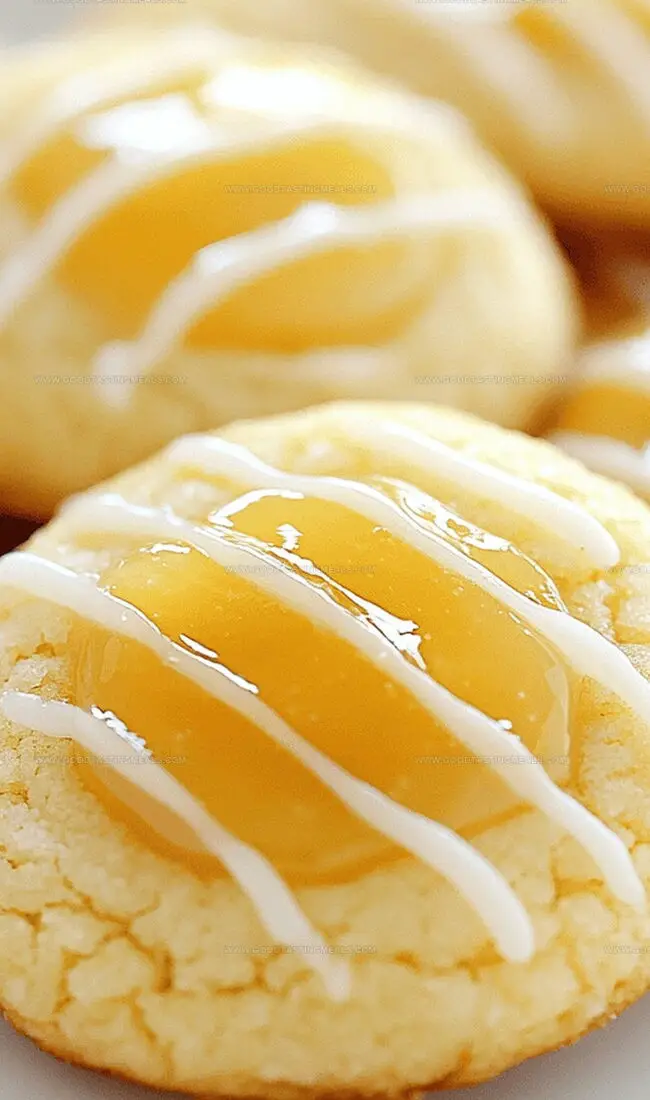
Each cookie nestles a dollop of vibrant lemon curd in its center, creating a perfect balance of textures.
The delicate crumb melts effortlessly on your tongue, releasing bursts of refreshing lemon.
Simple to make and impossible to resist, these cookies will become your new go-to dessert for any occasion.
Bake a batch and watch them disappear in moments.
Quick Recipe Overview

Ingredients for Lemon Thumbprint Cookies
For The Base:For The Flavor Makers:For The Finishing Touches:Lemon Thumbprint Cookies: Tools You’ll Need
Lemon Thumbprint Cookies Made Simple
Blend soft butter with sugar until smooth and creamy. Add fresh lemon zest, tangy juice, an egg, and a splash of vanilla to create a vibrant mixture. Gently fold in flour with a delicate touch, creating a silky dough that whispers of citrus.
Wrap the dough in plastic and tuck it into the refrigerator. Let it rest and develop flavor for several hours, allowing the ingredients to mingle and intensify.
Roll tiny balls of chilled dough, giving each a gentle bath in sparkling sugar. Create a cozy little nest in the center of each cookie using your fingertip.
Fill each cookie’s center with a dollop of bright, sunny lemon curd. This will be the heart of your delightful treat.
Slide the cookies into a warm oven, letting them transform into golden, delicate rounds. Watch carefully as edges turn a soft, inviting brown.
Once cooled, drizzle a whisper-light lemon glaze across the cookies, creating a glistening finish that adds a final burst of citrusy brightness.
Brighten Lemon Thumbprint Cookies with These Tips
Serve Lemon Thumbprint Cookies Creatively
Preserve Lemon Thumbprint Cookies with Ease
Print
Tangy Lemon Thumbprint Cookies
- Total Time: 3 hours (includes chilling time)
- Yield: 22 1x
Description
Zesty lemon thumbprint cookies bring sunshine to classic shortbread with tangy curd filling. Buttery, crumbly cookie bases cradle rich lemon centers, offering sweet-tart perfection you’ll crave after one delightful bite.
Ingredients
- 14 tbsps (200g) unsalted butter, softened to room temperature
- 2.25 cups (281g) all-purpose flour, spooned and leveled
- ¾ cup (150g) granulated sugar
- 1 large egg, at room temperature
- 1 tbsp fresh lemon zest
- 1 tbsp fresh lemon juice
- 1 tsp vanilla bean paste (or vanilla extract)
- ¼ tsp salt
- 1 tbsp (8g) cornstarch
- ½ cup (100g) granulated sugar
- ½ cup (140g) homemade lemon curd or store-bought
- 1 cup (120g) confectioners’ sugar
- 2 tbsps (30ml) fresh lemon juice
Instructions
- Preparation: Whisk flour, cornstarch, and salt in a mixing bowl until perfectly blended, creating a uniform dry foundation.
- Creaming: Blend butter and granulated sugar using an electric mixer until airy and pale, then integrate lemon zest, lemon juice, egg, and vanilla bean paste for vibrant flavor complexity.
- Dough Formation: Fold dry ingredients into the creamy mixture, forming a consistent dough. Wrap and refrigerate for 3 hours to develop rich, concentrated flavors.
- Shaping: Remove chilled dough and craft uniform spheres, generously coating each in granulated sugar. Position cookies on parchment-lined baking sheets with strategic spacing.
- Thumbprinting: Gently press a subtle indentation into each cookie’s center, creating a perfect vessel for lemon curd. Fill each depression with precise, consistent lemon curd placement.
- Baking: Preheat oven to 350°F. Bake cookies until edges transform to a delicate golden tone, roughly 12-13 minutes, ensuring a crisp yet tender texture.
- Cooling and Glazing: Transfer cookies to a cooling rack, allowing complete temperature reduction. Whisk confectioners’ sugar and lemon juice into a glossy, smooth glaze.
- Finishing: Elegantly drizzle the luminous icing across cooled cookies, permitting the glaze to set for 30 minutes before serving these delectable treats.
Notes
- Chill Dough Thoroughly: Refrigerate for at least 3 hours to develop robust flavor and prevent spreading during baking, ensuring a perfect cookie texture.
- Handle Thumbprints Gently: Create shallow, even indentations without piercing the cookie base, allowing lemon curd to nestle perfectly without leaking.
- Sugar Coating Technique: Roll cookies completely in granulated sugar for a delicate, crisp exterior that adds subtle sweetness and elegant sparkle.
- Cooling is Crucial: Let cookies rest on baking sheet briefly before transferring to wire rack, preventing potential cracking and maintaining structural integrity.
- Prep Time: 15 minutes
- Cook Time: 13 minutes
- Category: Desserts, Snacks
- Method: Baking
- Cuisine: American
Nutrition
- Serving Size: 22
- Calories: 136
- Sugar: 10g
- Sodium: 35mg
- Fat: 6g
- Saturated Fat: 4g
- Unsaturated Fat: 2g
- Trans Fat: 0g
- Carbohydrates: 19g
- Fiber: 0g
- Protein: 1g
- Cholesterol: 15mg
Sophie Martin
Co-Founder & Content Creator
Expertise
Education
Stellenbosch University, South Africa
South African Chefs Academy, Cape Town
Sophie Martin is the nutrition brain and feel-good foodie at Good Tasting Meals. With a degree in Human Nutrition from Stellenbosch University and chef training from the South African Chefs Academy, Sophie brings balance to the table, literally. She loves creating meals that are easy to make, great to eat, and good for your body too.
Her recipes are made for everyday living, with a little flair and a lot of heart. Sophie’s not here to count calories, she’s here to show you how fresh, simple food can fit into your life, taste amazing, and still be nourishing.