Vanilla magic custard cake enhances ordinary ingredients into an extraordinary dessert with mesmerizing layers that seemingly defy culinary logic.
This enchanting treat challenges traditional baking expectations by creating a stunning three-tiered texture during a single baking process.
Magical chemistry happens inside your oven, where simple ingredients mysteriously separate into distinct, delicate strata.
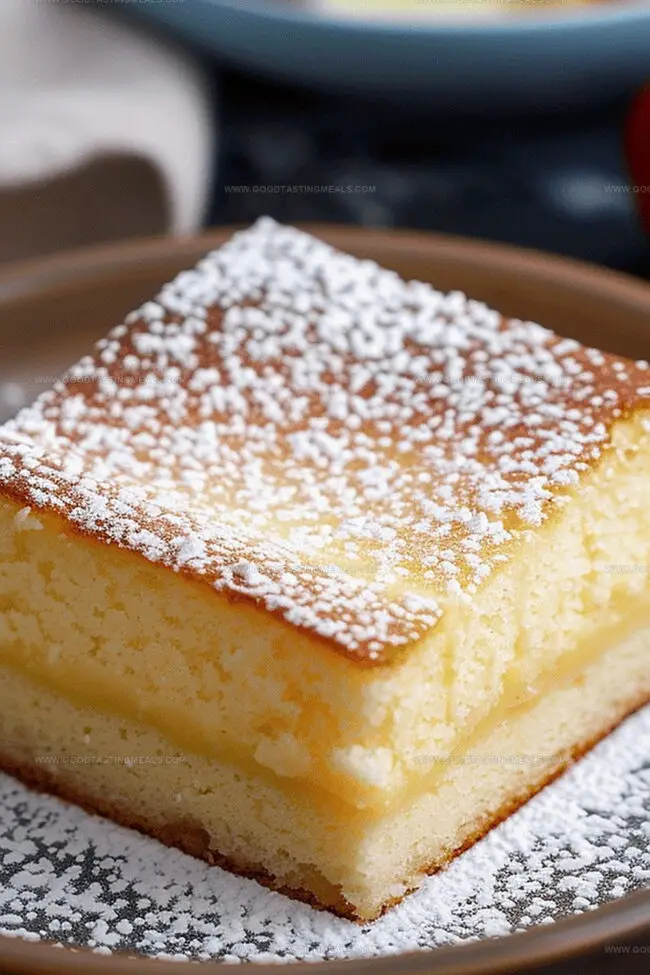
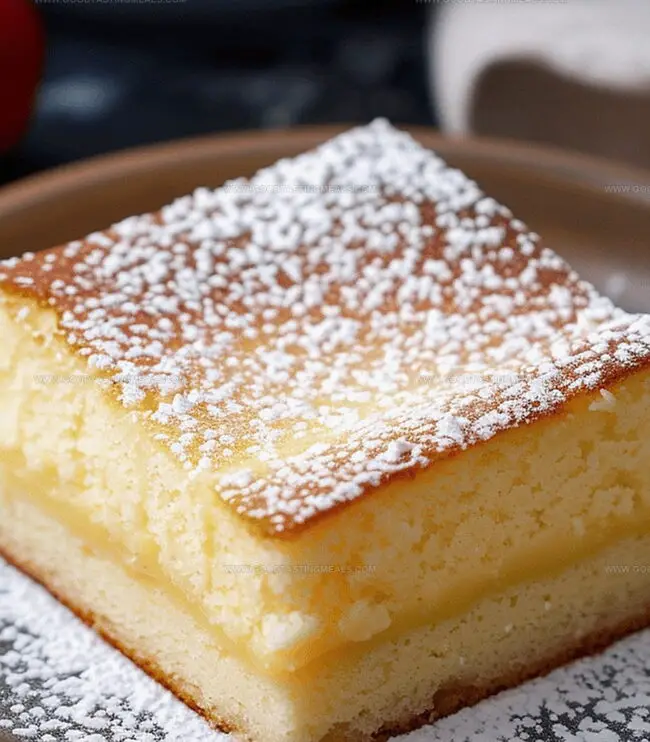
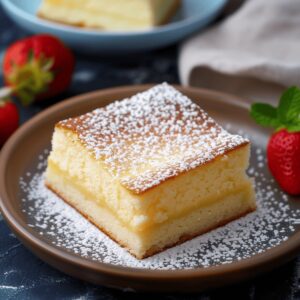
The cake unique structure emerges from a thin, delicate top crust resting above a creamy custard center and a dense, rich bottom layer.
Whisking the batter requires gentle technique and precise movements to maintain the delicate balance of ingredients.
Precision matters when crafting this remarkable dessert, as slight variations can dramatically alter the final result.
Home bakers eager to experience culinary alchemy will find this recipe both intriguing and delightfully approachable.
Layers of Love in Vanilla Magic Custard Cake
Magical Layered Texture: This custard cake creates a stunning three-layer effect during baking, with a dense bottom, creamy middle, and light fluffy top that magically separates without any complex techniques.
Effortless Elegant Dessert: Requires minimal ingredients and basic baking skills, making it perfect for home bakers wanting to impress without spending hours in the kitchen. Transforms simple pantry staples into a restaurant-worthy treat.
Versatile Vanilla Delight: Delivers a rich, comforting vanilla flavor that works beautifully as a sophisticated dessert or simple afternoon treat. Can be dressed up with fresh berries or enjoyed perfectly plain, appealing to various taste preferences.
Quick Comfort Baking: Comes together in under an hour from start to finish, providing a quick solution for sudden dessert cravings or unexpected guests. The straightforward method ensures consistent results with minimal stress.
Essentials for Vanilla Magic Custard Cake
Eggs:
Egg Whites: Key component for creating light, airy texture in the cake.
Egg Yolks: Provides rich, creamy base and helps bind ingredients together.
Dairy and Fats:
Butter, Milk: Essential for creating smooth, moist cake with rich flavor.
Purified Water: Helps adjust batter consistency and moisture level.
All-Purpose Flour: Provides structure and foundation for the cake.
Pure Vanilla Extract: Delivers classic, warm vanilla flavor to the entire dessert.
Crafting Your Vanilla Magic Custard Cake
Step 1: Prepare the Oven
Preheat the oven to 325°F (163°C) and set up the middle rack for even baking.
Step 2: Prepare the Baking Dish
Grab an 8×8 inch baking dish
Spray with non-stick cooking spray
Ensure complete and even coverage
Step 3: Whip the Egg Whites
Separate egg whites into a clean mixing bowl
Whisk vigorously until stiff peaks form
Set aside for later use
Step 4: Create the Yolk Mixture
Combine egg yolks with confectioners’ sugar
Beat until the mixture turns pale yellow
Mix thoroughly to create a smooth base
Step 5: Add Liquid Ingredients
Blend in melted butter
Pour in water
Mix for about 2 minutes until well combined
Step 6: Incorporate Dry Ingredients
Sift all-purpose flour into the mixture
Stir gently to prevent lumps
Ensure smooth, even consistency
Step 7: Mix in Milk and Vanilla
Slowly pour lukewarm milk
Add pure vanilla extract
Blend until batter becomes completely smooth
Step 8: Fold in Egg Whites
Gently fold egg whites into batter
Do this in 3 separate additions
Be careful not to deflate the whites
Step 9: Bake the Cake
Pour batter into prepared baking dish
Place in preheated oven
Bake for 40-60 minutes
Check at 40-minute mark
Cover with aluminum foil if top browns too quickly
Step 10: Cool and Serve
Remove cake from oven
Let cool to room temperature
Dust with confectioners’ sugar before serving
Slice and enjoy the magical texture
Pro Tips for Vanilla Magic Custard Cake
Whip Egg Whites Perfectly: Beat egg whites until they form stiff, glossy peaks that hold their shape without falling, which ensures the cake’s signature light, layered texture.
Fold Gently: Use a spatula to fold egg whites into the batter in three careful batches, cutting through the center and scooping around the edges to maintain the airiness.
Check Oven Consistency: Use an oven thermometer to verify the exact temperature, as slight variations can dramatically affect the cake’s delicate layering and texture.
Watch Browning Carefully: Keep a close eye on the cake after 40 minutes, covering with aluminum foil if the top browns too quickly to prevent burning while ensuring even baking.
Cool Completely: Allow the cake to cool entirely at room temperature, which helps the layers settle and develop their unique creamy, custard-like consistency before dusting with powdered sugar.
Save and Warm Up Vanilla Magic Custard Cake
Refrigerate the Vanilla Magic Custard Cake in an airtight container within 2 hours of baking. Cover the cake loosely with plastic wrap or aluminum foil to prevent moisture loss and absorb other refrigerator odors. Store in the refrigerator for up to 3-4 days, maintaining its delicate texture and rich flavor.
Reheating works best using gentle methods. Warm individual slices in the microwave for 10-15 seconds at 50% power to prevent rubbery texture. Alternatively, warm the cake slice in a preheated oven at 300°F for 5-7 minutes, which helps restore its original soft, custardy consistency.
Freezing is possible but not recommended due to the delicate custard structure.
Match Made in Heaven: Vanilla Magic Custard Cake Pairings
Sip Sparkling Dessert Wine: Pair this delicate vanilla custard cake with a chilled moscato d’asti or sweet prosecco to complement its light, creamy texture and enhance the vanilla undertones.
Brew Creamy Coffee Companion: Serve alongside a smooth cappuccino or latte with a gentle sprinkle of cinnamon, which will echo the cake’s soft sweetness and provide a rich, warming contrast.
Create Fruity Flavor Boost: Accompany the custard cake with fresh raspberries or strawberry compote, adding a bright, tangy element that cuts through the dessert’s richness and provides a refreshing palate cleanser.
Explore Herbal Tea Harmony: Select a delicate chamomile or lavender tea to highlight the cake’s subtle vanilla notes, creating a soothing and elegant dessert experience that balances the cake’s creamy consistency.
Vanilla Magic Custard Cake, Remixed
Chocolate Marbled Magic Cake: Swap a portion of flour with cocoa powder and create a swirled effect by adding chocolate batter in layers before baking, resulting in a rich, decadent variation with beautiful chocolate patterns.
Lemon Zest Custard Cake: Incorporate fresh lemon zest and replace vanilla extract with lemon extract for a bright, citrusy version that offers a refreshing twist to the classic recipe.
Coconut Dream Cake: Mix shredded coconut into the batter and sprinkle toasted coconut flakes on top after baking, creating a tropical-inspired dessert with added texture and nutty flavor.
Almond Cream Magic Cake: Substitute vanilla extract with almond extract and garnish with sliced almonds before serving, delivering a subtle nutty undertone and elegant presentation.
Vanilla Magic Custard Cake reveals pure dessert alchemy with its three-layered wonder born from one magical batter. French pastry craftsmanship creates a delicate cake where silky custard nestles between light sponge, promising sweet indulgence you cannot resist.
Ingredients
Scale
Main Ingredients:
4 eggs, separated
1 cup (115g) all-purpose flour
½ cup unsalted butter
2 cups milk
1 and ¼ cups (150g) confectioners’ sugar
Liquid Ingredients:
2 teaspoons pure vanilla extract
1 tablespoon purified water
Garnish:
Confectioners’ sugar
Instructions
Preheat the oven to 325°F (163°C), positioning the rack in the center for optimal heat distribution.
Generously spray an 8-inch by 8-inch (20 centimeters by 20 centimeters) baking dish with non-stick cooking spray, covering all interior surfaces evenly.
Separate egg whites into a pristine mixing bowl and whip vigorously using an electric mixer until stiff, glossy peaks form. Set aside temporarily.
In a separate large mixing bowl, cream egg yolks with confectioners’ sugar until the mixture transforms into a pale, creamy consistency.
Gently incorporate melted butter and water into the egg yolk mixture, blending thoroughly for approximately two minutes until completely integrated.
Sift all-purpose flour directly into the mixture, stirring carefully to eliminate potential flour clumps and create a smooth batter.
Gradually pour lukewarm milk and pure vanilla extract into the batter, whisking continuously to maintain a uniform texture.
Delicately fold whipped egg whites into the batter in three sequential additions, maintaining the airiness of the whites while ensuring complete incorporation.
Transfer the final batter into the prepared baking dish, spreading evenly with a spatula.
Place in the preheated oven and bake for 45-55 minutes, monitoring closely after 40 minutes. If the top browns too quickly, loosely cover with aluminum foil.
Remove from the oven and allow the cake to cool completely at room temperature for approximately 1-2 hours.
Once cooled, dust the surface lightly with additional confectioners’ sugar for an elegant finishing touch before serving.
Notes
Achieving those signature stiff peaks for egg whites requires patience and a clean, grease-free whisk to ensure maximum volume and stability.
Sifting dry ingredients like flour and confectioners’ sugar eliminates pesky lumps, creating a silky smooth batter that guarantees a delicate texture.
Lukewarm milk blends more seamlessly into the mixture, preventing potential curdling and promoting even distribution of ingredients.
Gentle folding technique is crucial when incorporating whipped egg whites to maintain their airy structure and prevent deflation, which ensures the cake’s magical layered texture.
Aluminum foil acts as a protective shield if the cake’s surface browns too quickly, preventing burning while allowing the interior to bake evenly.
Cooling the cake completely at room temperature allows the custard layers to set properly, enhancing the dessert’s distinctive and delightful texture.
Dublin Institute of Technology (now Technological University Dublin)
Program: Bachelor of Arts in Culinary Arts
Focus: Hands-on training in cooking techniques, kitchen management, and exploring both Irish and international cuisines.
Ballymaloe Cookery School, County Cork, Ireland
Program: 12-Week Certificate Course
Focus: Farm-to-table cooking, emphasizing the use of fresh, local ingredients and traditional cooking methods.
Liam O’Brien is the co-founder and kitchen soul behind Good Tasting Meals, a chef who believes that cooking shouldn’t feel stressful or complicated.
He earned his culinary stripes at Technological University Dublin and polished his farm-to-table skills at Ballymaloe Cookery School. With over 15 years flipping pans and stirring up stories, Liam has worked in family cafés, bustling bistros, and everything in between.
At Good Tasting Meals, Liam brings you recipes that feel like home: cozy, simple, and full of flavor.


Liam O’Brien
Founder & Recipe Developer
Expertise
Education
Dublin Institute of Technology (now Technological University Dublin)
Ballymaloe Cookery School, County Cork, Ireland
Liam O’Brien is the co-founder and kitchen soul behind Good Tasting Meals, a chef who believes that cooking shouldn’t feel stressful or complicated.
He earned his culinary stripes at Technological University Dublin and polished his farm-to-table skills at Ballymaloe Cookery School. With over 15 years flipping pans and stirring up stories, Liam has worked in family cafés, bustling bistros, and everything in between.
At Good Tasting Meals, Liam brings you recipes that feel like home: cozy, simple, and full of flavor.